Reversible, unpadded ring sling: Method
1 | Method 2 | Method 3
 This
method is a bit more secure for fabrics of different weights -- brocade and lightweight
lining, for example -- because the rings are not held right against the seam
that joins the two fabrics (as they are in method 1). It uses a method more like
the fleece
ring sling to reduce bulk at the ring end, as well.
This
method is a bit more secure for fabrics of different weights -- brocade and lightweight
lining, for example -- because the rings are not held right against the seam
that joins the two fabrics (as they are in method 1). It uses a method more like
the fleece
ring sling to reduce bulk at the ring end, as well.
Please note: if you're making slings using this method
that you intend to sell, please include a link back to these instructions in
your sales page. I was pretty happy being the only overlapping-pleat sling maker
on the market, and would like a little credit if you're selling them! You can
use the graphic at the bottom of the page, or just a text link -- either is fine.
these directions have taken me many, many hours to put together -- they are not
just some random freebie. All directions on the site are
copyright to Jan Andrea, for personal use only, and are not intended for
bulk resale.
Materials needed:
- Fabric:
- Desired length of sling, times two. See the size
chart for the slings I sell
for fur ther detail. One piece of the fabric -- the thicker piece -- should be
about 6 inches longer than the other when cut to length.
- See the Fabric FAQ for specific fabric recommendations
and online sources
- Two-layered slings are great for silk brocades -- the front side of a brocade
is stunning, but often the reverse is messy or strange. People use all kinds
of fabrics for the lining; I'd stay away from anything too satiny or slippery,
but pretty much any silk or silk blend is great -- very luxurious.
- Rings:
- See the new Rings section in my Fabric FAQ
- I really like the new aluminum SlingRings for
brocade slings -- they look gorgeous, and because they are so smooth, they won't
catch on the small threads in brocade fabrics. I don't think I'd use nylon rings
on a brocade or silk sling, but they'd be fine for other two-layer slings.
- Sewing machine and thread to match/contrast with the fabric.
- Time: about 2 hours
Preparing your fabric:
If your fabric is wider than about 36", I would suggest cutting it down
to 36" or less. If your fabric is thick, 30" is about as wide as I
would recommend; if it is thinner, 36" is fine.
Optional pocket:
If you want a pocket in your sling, I would recommend using an inset pocket.
I have made pockets where I put a facing on the brocade, sewed in the zipper,
and then just sewed the two fabric layers together to form the pocket bag, but
have since rethought the idea, as that can add stress to both layers and shorten
the life of the sling. An inset pocket with a zipper takes a little more time
to create, but the results are more professional. Click
here for a full page with instructions. Put the pocket on before sewing the
rest of the sling.
Sewing the fabrics together:
 Sew the
two lengths of fabric together along one of the short sides. This should be a
fairly sturdy seam -- I'd sew it once with the wrong sides together, then topstitch
so that the thinner fabric seam allowance is pressed under the thicker fabric.
Sew the
two lengths of fabric together along one of the short sides. This should be a
fairly sturdy seam -- I'd sew it once with the wrong sides together, then topstitch
so that the thinner fabric seam allowance is pressed under the thicker fabric.
Now, line up
the other short sides, right sides together. This will mean that 3" of the thicker
fabric shows at the top. (As it's 6" longer than the thinner fabric, 3" of that
is on the top and 3" on the reverse.) Sew the fabrics together like that,
leaving a space for turning. Turn right-side-out and topstitch the edges.
A brief diversion: how to make a border around the edges using this method
Cut your fabric so that the one you want to be the border is wider -- if you
want a 1/2" border on each side, make the border fabric about 1" wider
than the other fabric. Mark the center of each fabric on one of each fabrics'
short edges.
[This
is where it gets a little weird. I can't visualize a way to do both the borders
and the longer outside fabric in one step, so I think it will be necessary to
do the border part first, then fold the outer fabric over and topstitch it. There
may be a way, but my brain isn't cooperating.]
Sew
the long edges, right sides together, and when you get to the longer part, fold
the edges under with the same seam allowance and keep sewing, making a partially-finished
hem (that is, fabric folded up once, so a raw edge is still visible, ra ther than
twice) on all three of its unfinished sides This is easier if you started with
the longer fabric on top, since its hem will need to be folded upwards.
 Now,
line up the center marks on one cut edge, so that the borders are sticking out
equally on the long sides. With the right sides together, sew this set of the
cut edges.
Now,
line up the center marks on one cut edge, so that the borders are sticking out
equally on the long sides. With the right sides together, sew this set of the
cut edges.
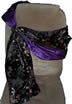
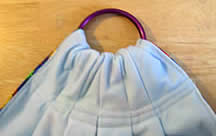
the picture
at right shows the sling as it will be when turned right-side out -- you can
see the borders on the edges, and, on the outer fabric that sticks out, where
the edges have been hemmed.
 For
the other end, fold half of the longer portion over, so that it meets the end
of the shorter fabric, and topstitch around the whole segment.
For
the other end, fold half of the longer portion over, so that it meets the end
of the shorter fabric, and topstitch around the whole segment.
then you can start
sewing in the pleats.
Pleats:
 Now, you just sew as you normally would for the fleece
ring sling. When sewing in the pleats, sew 6" from the edge
Now, you just sew as you normally would for the fleece
ring sling. When sewing in the pleats, sew 6" from the edge
(If your
fabrics are both very thin, you can use the regular
pleating method (folding
ra ther than sewing them in), but for brocades, it will probably be necessary
to remove the excess fabric, or it will be too thick at the ring end. I prefer
to sew them in for most projects. If you prefer the hot-dog, fanned, or other
shoulder designs, you can use them, but I don't know how well they will work
in terms of the thickness at the shoulder.)
Make sure that when you sew the pleats in, the 3" overlapping piece is considered
the clean side, as it will be folded over the rings and sewn down in the next
step.
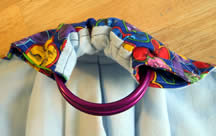
Putting in the rings:
After you've made the pleats, just put the rings on as with a regular sling.
Fold the 3" overlap over the rings towards its coordinating color. Sew the rings
in with at least two, but preferably three lines of stitching for strength. If
you removed the excess fabric, the sewing will go a little easier, but it's still
pretty thick. Sew slowly, turning the machine by hand if need be, and use a fairly
thick needle for this part. If you get frustrated, turn off the machine and cool
off for ten minutes (I know, I've been there -- I never cursed more and louder
than I do at my sewing machine!)
 |
 |
 |
| Outer/thicker side |
Inner/thinner side |
Seam within ring --
the
thicker fabric takes the stress! |
Threading your sling and babywearing:
I finally got around to adding illustrated
directions on threading and wearing your sling. Please check them out! If
you have any questions, please email
me!
All content, barring that which is otherwise attributed, is ©2023 to
Jan Andrea. If you wish to use my content on another page, please email before
doing so, even for content with the Creative Commons licenses. Text/images used
elsewhere must be attributed to me. Be advised that I will pursue copyright
violations.