Note: All seam allowances are 1/2 an inch.
- You can use the same fabric for the body and the lining, strap, and flap,
or whatever combination you prefer. If you have made several slings, you could
use fabric from each of them and the bag would then match all of them!
- the body of the bag and the lining will each be made with the 15"x11" pieces.
No cutting is involved.
- the all-around pockets are made with the 15"x9.5" piece.
- the flap is made with two 6"x10" pieces
|
- the layout for stitching lines is at left.
- Take the 15"x 9.5" piece and make a narrow hem on one long edge
(one inch is allowed).
- Lay that piece on top of the bag body piece and pin them together, so that the hemmed edge is about 2" down from the top of the bag body piece.
- Sew through the fabric as show in the layout. This will make the pockets,
so use a fairly sturdy stitch.
- You could do the same thing for the lining, if you wanted pockets on the
inside as well... Or just do this with the lining for inside pockets instead
of outside ones.
- For the lining, you can either sew in these stitching lines or just mark them -- there's no need to sew them, if you mark.
|
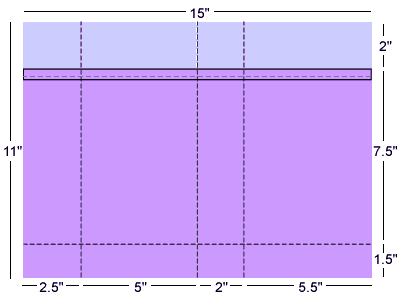 |
- Next, sew the short edges right sides together, treating the body and pocket
pieces as one (i.e. sew through all 4 pieces of fabric).
- Now, fold the bag in half so that the larger segments (5" wide) line
up together. Make a seam along the bottom.
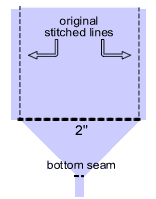
- You'll now be making the darts that make the bag three-dimensional
(a box instead of a pouch).
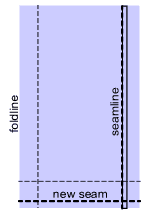
- Open out the bag, making the original vertical stitched lines (as in the
layout) the edges.
- Flatten the lower corners into triangles, and stitch across the horizontal
stitching lines
|
  |
- Repeat steps 3-5 for lining, using markings or stitching lines as guides.
- Make the strap:
- Measure from your waist or hip,
over the opposite shoulder, and to your waist or hip again.
- I would recommend
starting with a piece about 5" wide, so that the finished strap is about 2" wide.
- Sew the long edges right-sides together, then turn. Topstitch edges if desired.
- Make the flap:
- Fold the 12"x10" piece in half, right sides together, so that it's 6"x10".
- If you want a curved bottom on the flap, use a bowl or small plate to trace the curve. Cut the excess from the folded piece.
- Sew the long edges (including the fold) and the curve/bottom edge of the
flap, leaving the top open for turning.
- Turn the flap right-side out and topstitch the edges.
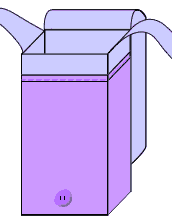
- Putting it all together:
- Baste the straps to the sides of the main body, right sides together.
- Baste the flap to the main body, right sides together.
- Put the main body/straps/flap inside the lining, right sides together, so
that you can sew the outside to the lining at the top of the bag.
- Stitch around the top of the bag, leaving a 3" hole for turning at the front
of the bag (i.e. The side without the flap).
- Turn the bag right side out through the hole.
- Topstitch around the top of the bag, sewing the turning hole closed. This
also gives extra strength to the stitching of the flap and straps.
- You can leave the bag as it is, or sew on a button/buttonhole to close it,
or use a different closure.
- Enjoy! This is also a great bag for solo outings -- it's small and compact,
and without diapers/wipes in it, will hold a lot of stuff.
|
 Sometimes I don't want to carry a huge bag... and sometimes, even the original
Breastfeeder's Bag feels too big to me. When I'm just
running to the post office or making a quick trip to the store, I only need one
diaper and a few wipes, my wallet, and a place for coupons. In that spirit,
here's a small bag that works well with a sling, and is a lot easier to sew than the original bag. This pattern is copyright
to me (Jan Andrea) and is NOT for resale under ANY circumstances!
Sometimes I don't want to carry a huge bag... and sometimes, even the original
Breastfeeder's Bag feels too big to me. When I'm just
running to the post office or making a quick trip to the store, I only need one
diaper and a few wipes, my wallet, and a place for coupons. In that spirit,
here's a small bag that works well with a sling, and is a lot easier to sew than the original bag. This pattern is copyright
to me (Jan Andrea) and is NOT for resale under ANY circumstances!