For 56-60" wide fabric:
Instead of making just one
sling, you can buy 2 to 2.5 yards of fabric, cut in half down the foldline,
and voila, you have two pieces of 30" wide fabric, enough for two slings.
You can then keep one to give as a gift to a new mom, or have one for yourself
and one for a spouse, or one to wear and the other to wash (especially helpful
in the early, poop-blowout-prone days).
I recommend buying the full length you'll
need and cutting it in half lengthwise to make two slings as above (or one sling
with a 30" by 2 yard piece for other projects).
If you *absolutely* can't buy the full two yards, then you can piece
together a shorter length to make a sling. Just be aware that any seam is
a potential place for ripping, and make sure you sew it safely if you have no
other options but using a shorter piece. |
For 45" wide fabric: |
If you are using a bottomweight (see the Fabric
FAQ for details), just
cut 15" off one edge and hem the sides (as in the directions below). You can
use the extra 15" strip to make a doll sling or some accessories to go with your
sling.
If you must use a lightweight or quilting fabric, try
these directions!
They make a safer sling of a more useful width than the just folding it in
half. 22" is really not wide enough for most secure carries, and this is not a method I would recommend. |
For either width of fabric... |
Hemming:
Hem the two long edges. If you have cut your fabric to length before sewing, hem one of the short edges, too. If you're going by the sling sizing guidelines, you can leave that short edge unhemmed because you'll be cutting the finished sling to length after you've tried it on anyway. I use a 1/2" hemming foot that was custom-made for my machine, but that's because I sew slings all day long :) You can often find narrower hemming feet for home machines, but they do make quite a narrow hem and are often a challenge to use. I prefer the 1/2" hems, so this is how I do it without a hemmer:
|
Pleats:
* There are almost as many ways to fold a sling to put it through the rings
as there are people who sew them! Please don't feel that you need to use pleats
in your sling. Here's a page I just made with some folding
variations -- many
of which are in use by other WAHMs who make slings. *
Here are some newly-revised step-by-step illustrated
pleating directions. Caveats: The wider the distance between pleats, the
wider the finished shoulder will be. I generally have mine about 1/2 - 5/8" apart.
If you put them 1" apart, which many first-time sling makers do, it will
be *very* wide on the shoulder and may not work well for you. I prefer the shorter
distance because it allows the fabric to spread out just enough on your shoulder,
without going over your arm and restricting movement. And it's not just an issue
of arm restriction: if the sling goes too far down your arm, it's hard to get
the lower rail snug enough to be safe without cutting off circulation in your
arm. So please, err on the side of smaller pleat spacing for comfort and safety.
Using this method, it's simplest to pin as you
go, at least on the raw edge. Or, from a suggestion by Deanna M., you can use
tape to hold the pleats in place. Masking tape, which comes off easily, would
also be a sewing aid if you have trouble sewing straight lines. I usually put
pins at the very top of the pleated section, and again at 5-6"
down, then sew perpendicuarly across the pleats at 1/2" and 5-6" from
the top, with a basting stitch that I can take out later, so it looks neater. Questions?
Check here.
Lookit! I made a video! Hopefully this will help the more visual folk among you.
|
Sewing in the rings: (click
any image for a larger version)
With pleats, I do not recommend sewing any further from the rings than about 3", and preferably closer to 2.5". With a pleated shoulder, the further away from the rings you sew, the less the fabric will be able to spread out over your shoulder and back, so sewing more than 3" from the rings can lead to a difficult-to-use and uncomfortable sling.
 |
 |
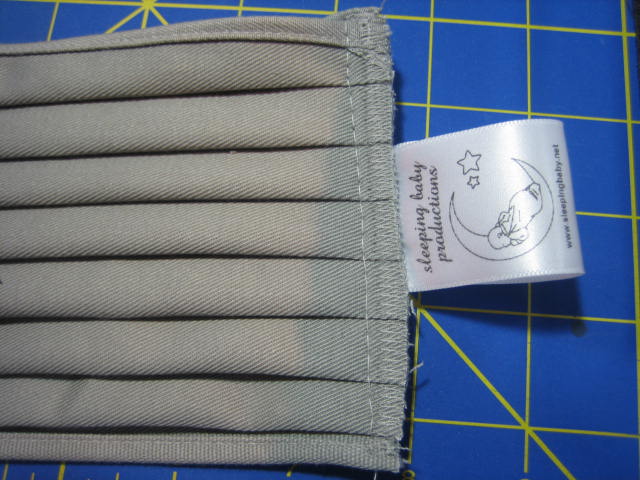
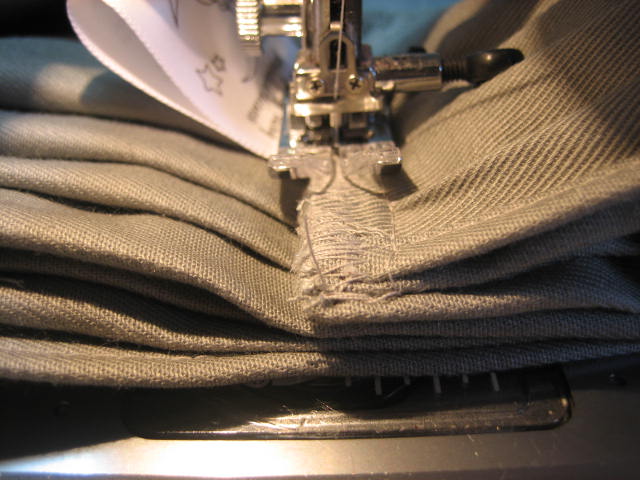
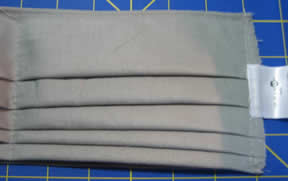
| You can see the pleats basted in (stitching on the left and right is about
6" apart, because this sling will have the thicker nylon SlingRings),
and the position of the needle and fabric in the machine as I prepare to zigzag
over the raw edge. |
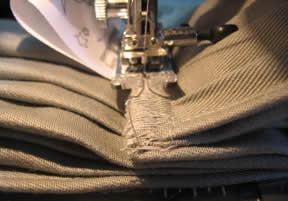
Showing the zigzag I use to finish the raw edge of the sling. I use a very
wide, close stitch (on my machine, the width is set to 7 and the length to 1.2,
although the numbers on your machine will probably be different), so that the
edge is completely enclosed with thread. This is far easier to sew through than
an edge that's been turned under, and it keeps the raw edge from fraying just
as well. |
 |
 |
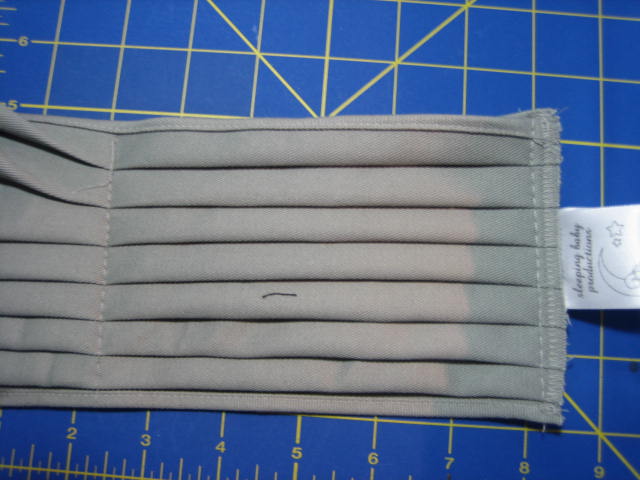
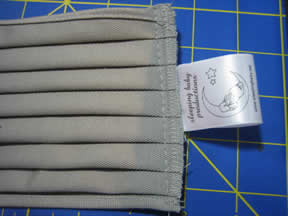
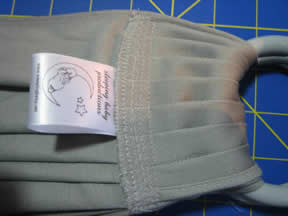
| Showing the "right" side of the pleats, basted in
and with the raw edge zigzag finished -- all the folds appear to be the same
width, although the back shows otherwise :) |
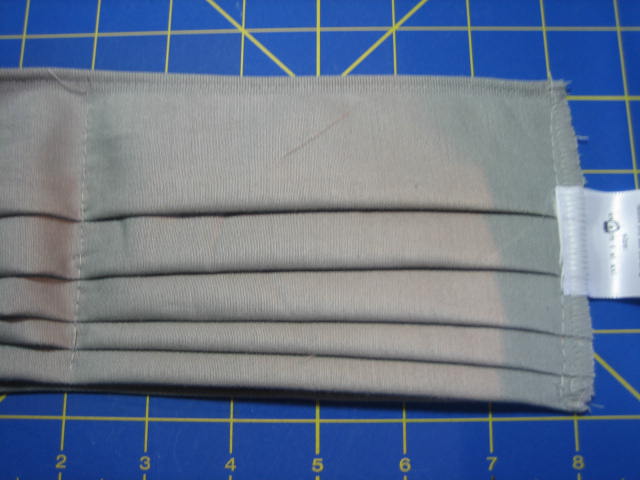
Showing the "wrong" side of the pleats, basted
in and with the raw edge zigzag finished -- you can see the first, large fold
at the top, and the subsequent pleats towards the bottom. |
 |
 |
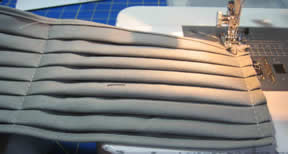
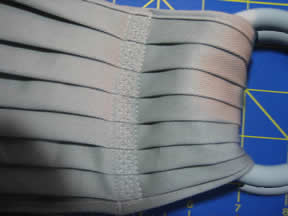
| First stitching line for sewing the two rings in -- note that
I am sewing just to the right of my basting stitches, and on top of the zigzag
stitch that keeps the raw edge from fraying. This is much easier to sew through
than folding the raw edge under (which works only with extremely thin fabrics)
and is just as tidy when in use. |
Finished -- back side. Between this picture and the last, I
have flipped the sling over and sewn another stitching line about 1/2" from the
first (from the "right" side of the sling), then a line of decorative stitching
between the two. I have also removed the inner line of basting stitches ( the
ones that were approx. 6" from the edge). |
 |
|
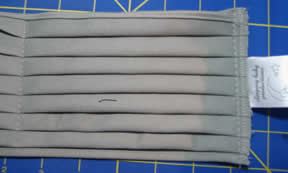
| Finished -- "nice" side. You can see the two lines of stitching
with the decorative stitch in the middle, and if I had a better macro shot, you
would also be able to see the holes left from the basting stitches. (Those disappear
when the sling is washed.) |
Optional: add a zippered
patch pocket to the tail of the sling. |
|
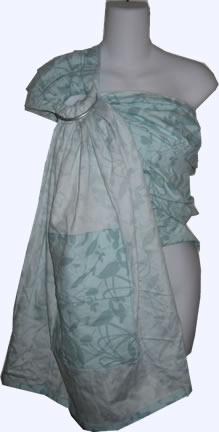
Threading your sling and babywearing:
I finally got around to adding illustrated
directions on threading and wearing your sling. Please check them out! If
you have any questions, please email
me! To thread your sling, place the ring-end on your shoulder so that the
rings hang a little higher than your armpit. Reach around, take the other end,
making sure that the fabric doesn't twist, and bring it through both rings from
underneath. Now thread the fabric through the bottom ring. Adjust to fit.
|
 2 to 2.5 yards of 54-60" wide fabric (depending on how
long you want the sling), or 2 - 2.5 yards of 36-45" fabric. (I will use
2.5 yards in the remainder of the instructions, but if you are smaller or want
a shorter tail, 2.25 yards is ample. Check the sizing page
for further detail.) Wash and dry the fabric before you sew! This is true for pretty much any sewing project.
2 to 2.5 yards of 54-60" wide fabric (depending on how
long you want the sling), or 2 - 2.5 yards of 36-45" fabric. (I will use
2.5 yards in the remainder of the instructions, but if you are smaller or want
a shorter tail, 2.25 yards is ample. Check the sizing page
for further detail.) Wash and dry the fabric before you sew! This is true for pretty much any sewing project.