 Fleece ring sling with sewn-in pleats
NB: There is always some rumor floating around that fleece isn't safe for baby slings. I'm not sure where this got started. Fleece, being a tightly-knit polyester, is *very* difficult to tear, so there isn't a fall hazard from tearing. (Fleece is not the same thing as flannel, which is a distressed cotton woven and *does* tear easily.) Because it's not as breathable as cotton or linen, you do need to take care that your baby's face doesn't get pressed into the fabric, and that the baby isn't too deep in any pouch that's made when wearing the sling, to prevent rebreathing CO2. And because it is quite warm, a fleece sling should be used only when it's very cold; babies can and do overheat quickly, so if you're using a fleece sling, feel the back of your baby's neck from time to time. If it's sweaty, remove a layer, and don't dress your baby in multiple layers and then use a fleece sling. Dress your baby in one fewer layers than you're wearing when s/he's in a carrier. Never, ever cover your baby's face with fabric, either from the sling or with your clothing. The majority of infant deaths in carriers have resulted when the parent is not able to check that the baby's airway is clear. This is common sense for *all* baby items (even carseat covers), not just carriers.
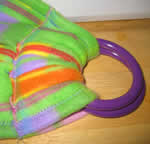
Fleece ring sling with sewn-in pleatsShown at right: the finished ring sling. Cutting out the excess material allows the sling to be adjusted far more easily than if it is left in, and it doesn't compromise the security of the sling. You can make a fleece sling with regular overlapping pleats, but then a lot of material is going through the rings, and it's thicker and less comfortable. I recommend using this method for polar fleece and other thick fabrics. If you're making slings using this method that you intend to sell despite my pleas, please at least include a link back to these instructions in your sales page.
See my sling sizing page for more information, and add several inches to the numbers shown there, to account for hemming and sewing in the rings.
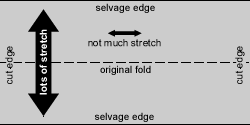 Polar
fleece usually has some stretch going from cut edge to cut edge, and a lot of
stretch going from selvage to selvage. Make sure you know
which direction is the stretchier one! This goes for any
stretchy fabric. The usual stretchiness for 2-way stretch fabrics is shown in the diagram at right. Generally, there will be a lot of stretch from selvage
to selvage (across the grainline) and much less, possibly none, from cut edge
to cut edge (along the grainline). However, some fabrics are 4-way stretch, meaning there is a lot of stretch in all directions, and some will have more stretch
going along the grainline instead, though those are relatively rare. The majority
of polar fleece will stretch as illustrated in the diagram.
Polar
fleece usually has some stretch going from cut edge to cut edge, and a lot of
stretch going from selvage to selvage. Make sure you know
which direction is the stretchier one! This goes for any
stretchy fabric. The usual stretchiness for 2-way stretch fabrics is shown in the diagram at right. Generally, there will be a lot of stretch from selvage
to selvage (across the grainline) and much less, possibly none, from cut edge
to cut edge (along the grainline). However, some fabrics are 4-way stretch, meaning there is a lot of stretch in all directions, and some will have more stretch
going along the grainline instead, though those are relatively rare. The majority
of polar fleece will stretch as illustrated in the diagram.
Most polar fleece comes in a 60" width. I recommend buying the full length you'll need and cutting it in half lengthwise to make two slings (or one sling with a 30" by 2 yard piece for other projects). If you *absolutely* can't buy the full two yards, then you can piece together a shorter length to make a sling. Just be aware that any seam is a potential place for ripping, and make sure you sew it safely if you have no other options but using a shorter piece.
Here's a video in case you find the photos confusing (which, given the plaid fabric, would not be a surprise):
 |
 |
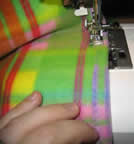
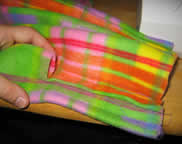
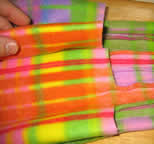
| 1. Hem both long edges (one cut and optionally one selvage) and one short edge, using a stretch stitch (zigzag, or something built-in on your machine) You don't, strictly speaking, have to hem, but I find that the hemmed edge is more comfortable and feels more secure than an unhemmed edge. | 2. Preparing to sew in the first pleat: fold the fabric in half, then stitch 2" from the fold, about 6" from the unhemmed edge. |
 |
 |
| 3. First pleat sewn in. | 4. Two pleats sewn in: second pleat is make by opening out the first pleat, folding 3" from its seamline, and stitching 2" from the new fold (see also this page) |
 |
 |
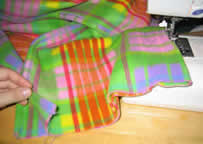
| 5. All the pleats sewn in -- a 30" width yields 5 sewn-in pleats if it's done correctly. | 6. Cutting out the excess fabric: with the *wrong side* up, cut the fabric within the pleat, to about 1/4" away from the seam line. The cut should end about 1/2" from the beginning of the seam line. |
 |
 |
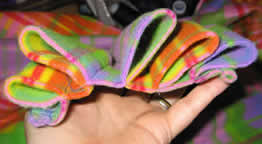
| 7. All of the excess material removed. | 8. Folding the pleats: the center pleat is squashed flat, so that there's 1" on either side of the seam. |
| If your sewing machine can't handle many layers of fabric: you can squash all the pleats like the one in step 8, so less material is overlapping in the final product. This gives a pleat that spreads out a bit more, but it's the most that some inexpensive sewing machines can handle. If you do that, just squash and pin the rest of the folds, then skip to step 13. | |
 |
 |
| 9. The next pleat is folded towards the middle, so that it overlaps the center pleat entirely. | 10. Fold the pleat opposite the one you just did, also towards the middle, overlapping the center pleat and the one from step 9. |
 |
 |
| 11. Fold the next set inwards -- they will overlap the second set, but won't fully overlap the center pleat. | 12. The other half of this set |
 |
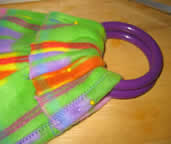 |
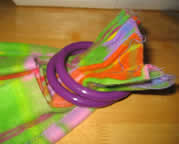
| 13. Thread on the rings. | 14. Pin the rings in -- the edge of the fabric should overlap the cut edges of the pleats by at least 1/2" for strength. |
 |
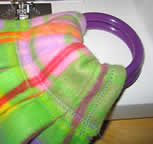 |
| 15. First ring-holding seamline -- sewn over the edge of the fabric. Fleece doesn't fray, so no further edge finishing is necessary. | 16. Second ring-holding seamline, sewn about 1/2" from the first, closer to the rings. |
The
finished ring sling. Cutting out the excess material allows the sling to be adjusted
far more easily than if it is left in, and it doesn't compromise the security
of the sling. You can make a fleece sling with regular overlapping pleats, but then a lot of material is going through the rings, and it's thicker and less
comfortable. I recommend using this method for polar fleece and other thick fabrics.