Quick and easy umbrella stroller accessories: Storage bag and water bottle
holder
 I'm
mostly a slinging mom, but when we went out for a whole, long day,
sometimes my toddler preferred to ride in the stroller. And DH prefers to push the baby
in the stroller anyway. Well, we have three strollers, but only one is suitable
for public transportation -- the $10 umbrella stroller. You can get fancier umbrella
strollers these days, but we didn't know about them when we bought ours 4 years
ago.
I'm
mostly a slinging mom, but when we went out for a whole, long day,
sometimes my toddler preferred to ride in the stroller. And DH prefers to push the baby
in the stroller anyway. Well, we have three strollers, but only one is suitable
for public transportation -- the $10 umbrella stroller. You can get fancier umbrella
strollers these days, but we didn't know about them when we bought ours 4 years
ago.  It is completely no-frills -- no storage at all. However, it does fold up
really small, and that makes it great to take on the bus or the subway. And yet,
I still need storage! I bought one of those mesh stroller bags, but it broke
pretty early on. And I bought a cupholder, but it broke, too. So I thought, geez,
why don't I just make those out of some of the scraps from my fabric stash? And
of course, then I have to put them up on the webpage :)
It is completely no-frills -- no storage at all. However, it does fold up
really small, and that makes it great to take on the bus or the subway. And yet,
I still need storage! I bought one of those mesh stroller bags, but it broke
pretty early on. And I bought a cupholder, but it broke, too. So I thought, geez,
why don't I just make those out of some of the scraps from my fabric stash? And
of course, then I have to put them up on the webpage :)
This pattern is copyright to me (Jan Andrea)
and is NOT for resale under ANY circumstances!
Materials needed:
- Fabric:
- I used some nylon that I'd bought a long time ago when I was
making a kite. Nylon is good for the water bottle holder because it dries quickly,
but if you don't have nylon, pretty much any scrap is fine. I used the same nylon
for the storage bag, because it's fairly sturdy.
- I don't think I'd necessarily
recommend calico, unless these will get fairly light usage, or you intend to
make them double-layered/reversible. Calico is pretty, but just doesn't stand
up to wear.
- the storage bag needs two 12" by 16" pieces. You can also make it
deeper if you want to; mine is 12" by 16" because that's the size of the nylon
pieces I had left :) You can use ribbon for the ties, or make self-fabric ties
with two 12" by 3" pieces. If you wanted to get fancy, you could use hook-and-loop
tape, too, but it works fine if you just tie the bag on. Note: it's a good idea
to measure the distance between handles on your stroller, just in case they are
wider than mine. If they are, keep that in mind when cutting your fabric.
- the water bottle holder I made used a 12" by 10" piece for the case,
and 6" by 3" for the hanging tab. That holds a Rubbermaid 1-quart bottle -- the
kind with vertical ridges and a grey top with a straw that hinges out. A standard
16-oz or 20-oz sports bottle will require less fabric. I would recommend grabbing
the bottle you'll be using this with, and just using it to measure how much fabric
you'll need -- wrap the fabric around it loosely, and mark where it overlaps.
- One snap (4 pieces), or a button and buttonhole, or a small piece of hook-and-loop
tape.
- Matching thread
- Around an hour of your time, depending on your sewing knowledge
Directions:
Note: All seam allowances are 1/2 an inch.
Storage bag:
- Cut out your pieces.
 Sew
the ties -- fold the pieces in half lengthwise, so you have a 12" by 1.5" piece.
Leave a small hole for turning, in the middle of the strips. Turn both ends through
the hole. No need to sew up the hole -- it will be taken care of when the tie
is attached to the bag. Fold the ties in half widthwise.
Sew
the ties -- fold the pieces in half lengthwise, so you have a 12" by 1.5" piece.
Leave a small hole for turning, in the middle of the strips. Turn both ends through
the hole. No need to sew up the hole -- it will be taken care of when the tie
is attached to the bag. Fold the ties in half widthwise.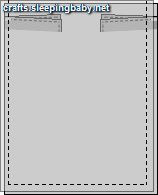 Put the two bag pieces right-sides together, and pin the ties in about 2
inches from what will be the top of the bag, with the fold at the seam allowance.
Put the two bag pieces right-sides together, and pin the ties in about 2
inches from what will be the top of the bag, with the fold at the seam allowance. - Sew around the edges, leaving the top free.
- If you are using a button, make a buttonhole in the middle, centered between
where the ties are sewn in (or do this step between steps 2 and 3)
- Make a hem around the top, leaving ties free, so that the ties are at the
top of the bag (as shown in the first picture)
- If you are using snaps, attach the snaps now; if using hook-and-loop tape,
same thing. If using a button, sew it on, too.
- Tie the bag to your stroller, just in front of the crossed bars but below
the handles. The lower it is, the less chance there is of the stroller tipping
backwards from too much weight in the bag.
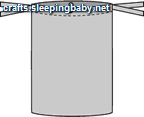
Water bottle holders:
- Cut out your pieces. I made two bags, because we'll be using the stroller
in Washington, DC, in August, and I anticipate drinking a lot of water! Plus,
if you make two, you can use one for water and one for snacks or whatnot.
- Sew the hanging tab -- just fold the 6" by 3" strip in half lengthwise (so
it's 6" by 1.5") and stitch the long edge. Turn.
- Sew the body of the holder: fold the fabric in half so that it's 6" by 10"
(or whatever your measurement was) and sew along two of the three raw edges,
leaving the top open.
 You can make the corners look neater by sewing across them using the method
described here, but it's not necessary.
You can make the corners look neater by sewing across them using the method
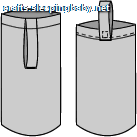
described here, but it's not necessary.- To attach the tab to the body of the holder, line up the raw edges as shown
at right. Fold the pieces down about 3/4", then fold the tab up. Stitch along
the edge (using a zig-zag stitch to keep the raw edge from fraying) and reinforce
the tab's attachment by sewing a little square around it.
- To attach the bottle holder to the stroller, pull the body of the holder
through the loop. Voila, a simple bottle holder with no plastic parts to break!
All content, barring that which is otherwise attributed, is ©2023 to
Jan Andrea. If you wish to use my content on another page, please email before
doing so, even for content with the Creative Commons licenses. Text/images used
elsewhere must be attributed to me. Be advised that I will pursue copyright
violations.