A Nursing Pillow that fits just right
 Maybe
you've seen the "Boppy" pillows in kids' stores like Toys R Us and
their ilk. Maybe you even own one. I don't, because I'm not built like the Barbie
doll they appear to have been designed for! I did get a pattern from Elizabeth
Lee Designs, which looked like it was made for a more realistic woman. However,
the one I sewed ended up self-destructing, as my ample waist was placing too
much stress on the inner curve. I made myself a second one after that, altering
the pattern so it was large enough to go around me, and have been using it ever
since. However, I thought, it would have been so simple just to make one that
would fit *me* the first time, why don't I help other women with that?
Maybe
you've seen the "Boppy" pillows in kids' stores like Toys R Us and
their ilk. Maybe you even own one. I don't, because I'm not built like the Barbie
doll they appear to have been designed for! I did get a pattern from Elizabeth
Lee Designs, which looked like it was made for a more realistic woman. However,
the one I sewed ended up self-destructing, as my ample waist was placing too
much stress on the inner curve. I made myself a second one after that, altering
the pattern so it was large enough to go around me, and have been using it ever
since. However, I thought, it would have been so simple just to make one that
would fit *me* the first time, why don't I help other women with that?
 The
idea behind a nursing pillow is simple: get the baby's mouth to a comfortable
level with the mother's breast, while giving her something on which to rest
her arms while feeding. Stephen takes this a step fur ther, and has had the
majority of his naps on the pillow in my lap :) If you are small enough to use
the Boppy comfortably, go for it; if not, it will only take you a few minutes
to draft a pattern that is uniquely your own, and use it to make the Perfect
Nursing Pillow for you. The other plus about making your own is that you can
include a strap, which makes it much easier to lug around if you intend to nurse
in more than one place (and you will!).
The
idea behind a nursing pillow is simple: get the baby's mouth to a comfortable
level with the mother's breast, while giving her something on which to rest
her arms while feeding. Stephen takes this a step fur ther, and has had the
majority of his naps on the pillow in my lap :) If you are small enough to use
the Boppy comfortably, go for it; if not, it will only take you a few minutes
to draft a pattern that is uniquely your own, and use it to make the Perfect
Nursing Pillow for you. The other plus about making your own is that you can
include a strap, which makes it much easier to lug around if you intend to nurse
in more than one place (and you will!).
This, along with a sling, makes a thoughtful shower
gift for an expectant mother, though of course you will have to guesstimate
about her circumferance. Make them in matching fabrics for a really "together"
look! Both of them are very simple projects, suitable even for beginning sew-ers.
My latest thing with the pillow pattern: a perfectly portable pillow (pardon the p's). We're taking a trip to Washington, DC, next week, and while I didn't want to lug my trusty pillow along with me, I did want a pillow to use in museums and other places we might nurse. It'll be chilly when we go (late October/early November), and we will have winter jackets and blankets. So I made the shell of a pillow, using a 16" strip of Velcro on the outer seam, and will stuff the shell with my coat when we are inside and need to sit down and nurse! It's a all the convenience of a nursing pillow with just the shell to carry around.
This pattern is copyright to me (Jan Andrea)
and is NOT for resale under ANY circumstances!
Please note: I do not make these pillows for sale. I have the directions up
here so that sewing mamas (dadas, grandmas, etc.) can make them for themselves
(partners, daughters, etc.) but I don't sew them for other people :) there are
a lot of very talented sewists on Etsy who sell them, though, so if you're in
the market, take a look there.
Edited to add, November 9, 2009: I've now seen nursing pillow inserts that
come with a paper pattern for sewing the cover at JoAnn Fabrics! How exciting
that something like this is now mainstream :) The pillow inserts are shaped pretty
much like a Boppy (i.e. if you're plus-sized, you're still out of luck), so they'll
be fine for average-sized women and below.
Materials Needed:
For drafting the pattern:
- Standard newspaper, drafting paper, butcher's paper, kraft paper, or any
other large sheet of paper
- Your favorite belt, skirt, pair of pants or shorts, or anything that will
hold the shape of your waist
- Something to write with
- A ruler
- About 10 minutes of time
For sewing the pillow:
- About 1 yard of soft, sturdy fabric:
- Calico prints are very pretty, but not sturdy enough to survive constant use
and frequent washings. If you want to use calico, I would suggest a sturdy lining
fabric, or interfacing.
- I recommend fabrics like a nice denim, corduroy, canvas, or the like.
- Keep in mind the fabric should also feel nice against your (and the baby's)
skin.
- You could even use the same fabric for a sling,
and have a matching set!
- If you don't have a fabric store nearby, or if your local store doesn't have
very good prices, try the
Fabric Club. I've ordered from them several times, and the fabric I've
received has always been of great quality at very low prices.
- Matching thread
- Two 16-oz. bags of stuffing. It sounds like a lot, but if you only use one,
the pillow goes floppy very quickly, and is then essentially useless.
- About 1 hour of time
Directions for drafting the pattern:
| Click drawings to enlarge: |
 |
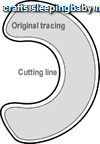 |
| Making the tracing |
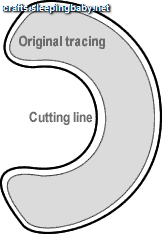
Drawing in a cutting line |
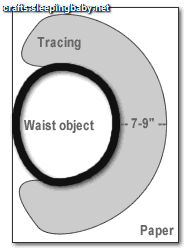
- Lay your paper down on the floor.
- Arrange your object of clothing/belt (closed or buttoned) so that the back
waistline touches the edge of the paper-- enough that the finished pillow
will go just fur ther than the middle of your sides.
- Trace around the object. This tracing, once cleaned up, will approximate
your sewing line.
- Using your ruler, mark where the outer seam will go, around the cardinal
directions.
- If you want a relatively wide pillow, use around 9";
- For a narrower one, use closer to 7".
- I do recommend a wide pillow, though.
- You may also taper the curve so that it is wider on the sides -- this
gives you more wiggle room for your elbows.
- Connect the markings you made, following the curve set by your waist.
- Draw in cutting lines about 1/2" from your seamlines to make a seam
allowance -- you may use a wider or narrower seam allowance, but a wide one
may save you from the seams opening up once the pillow is stuffed.
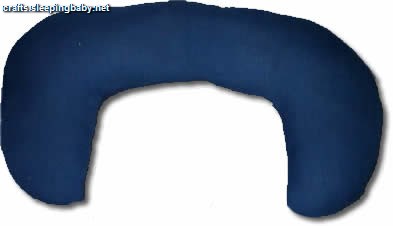
- You will (hopefully) end up with a C-shaped pillow as shown at right.
Directions for sewing the pillow:
- Lay your pattern on the fabric so that it fits best, and if there is a nap,
it runs in a comfortable direction (think about pulling your baby closer to
you on the pillow -- which way will feel best?)
- Cut out the pattern. If you want to make a strap, consider how long it should
be (whe ther it will go across your chest or just over your shoulder), and
try to leave enough fabric on one edge to accomodate that. Alternatively,
you could use a length of nice ribbon, or wide bias tape stitched closed --
whatever pleases you.
- OPTIONAL: Make a pocket for the pillow using the material left over in the
inner curve. A lined/turned patch pocket is the simplest one for this. If
you make a pocket, stitch it onto the pillow before sewing the two pieces
together. A pocket is great for a bottle of water or a book -- obviously they
will have to be taken out before putting the baby on the pillow, but a pocket
is handy for carrying purposes.
- Sew the inner curve first -- I recommend using a fine stitch, and going
over the seam a couple of times. You may want to do a French seam, as it is
quite sturdy.
- Prepare the strap, and sew it to the pillow, right sides together, with
the strap running along the inside of the inner curve (so that it's on the
outside when you turn the pillow). Definitely reinforce the point at which
the strap meets the pillow -- having it come undone would be a real pain!
- Sew around the outer curve, leaving a 5-6" gap in the center of the
outer curve for turning and stuffing. It's a good idea to reinforce this stitching,
as well, because the whole pillow will take a lot of abuse.
- Turn the pillow right side out.
- Stuff the pillow, "arms" first, avoiding excessive lumpiness in
the stuffing. Try to keep the pillow relatively "flat" -- so that
it's less cylindrical in cross-section, and more like a flattened oval. If
it is round, it will get flatter with time, but can be sort of annoying in
the beginning.
- Sew up the opening by hand -- a strong thread, or doubled regular thread,
is best, and make the stitches as tight and sturdy as you can.
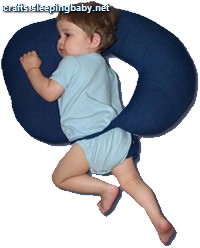
- You're done! Now you can nurse your baby in comfort.
Hints for use:
- If you make a strap, it should fit into the inner curve of the pillow when
you "wear" it, thus staying out of the way.
- the pillow works best with chairs without arms, or those with lower-set
arms. High-armed chairs tend to make the position a little too high for comfort.
- If you don't have any nursing tops, the pillow can hide your midriff when
you pull up your shirt to nurse... a plus for those of us who are a bit more
rotund than society prefers :)
- the pillow is nice for babies to lie on/sit up with as well -- just watch
out for the strap! You may want to make a cover for the pillow that holds
the strap against the inner curve; this could also be helpful if you don't
want to wash the whole thing every time baby spits up or has a diaper blowout.
- In fact, why not make a cover while you're sewing the pillow? Just cut out
another pillow pattern, but without the curved extentions on the ends, so
you can hem them and slip the pillow in and out of the cover.
- My latest thing with the pillow pattern: a perfectly portable pillow (pardon the p's). We're taking a trip to Washington, DC, next week, and while I didn't want to lug my trusty pillow along with me, I did want a pillow to use in museums and other places we might nurse. It'll be chilly when we go (late October/early November), and we will have winter jackets and blankets. So I made the shell of a pillow, using a 16" strip of Velcro on the outer seam, and will stuff the shell with my coat when we are inside and need to sit down and nurse! It's a all the convenience of a nursing pillow with just the shell to carry around.
Other breastfeeding pillow sewing directions on the web:
http://sewityourself.googlepages.com/ has
a printable pattern -- seems similar in size to the original pillow, for what
that's worth, and if you're larger, you will probably need to enlarge the opening.
I also prefer to make the hand-stitch (or zipper, in this particular pattern)
in the back of the pillow, not in the inner part, as it's easier to sew in
back in my experience.
All content, barring that which is otherwise attributed, is ©2023 to
Jan Andrea. If you wish to use my content on another page, please email before
doing so, even for content with the Creative Commons licenses. Text/images used
elsewhere must be attributed to me. Be advised that I will pursue copyright
violations.
 Maybe
you've seen the "Boppy" pillows in kids' stores like Toys R Us and
their ilk. Maybe you even own one. I don't, because I'm not built like the Barbie
doll they appear to have been designed for! I did get a pattern from Elizabeth
Lee Designs, which looked like it was made for a more realistic woman. However,
the one I sewed ended up self-destructing, as my ample waist was placing too
much stress on the inner curve. I made myself a second one after that, altering
the pattern so it was large enough to go around me, and have been using it ever
since. However, I thought, it would have been so simple just to make one that
would fit *me* the first time, why don't I help other women with that?
Maybe
you've seen the "Boppy" pillows in kids' stores like Toys R Us and
their ilk. Maybe you even own one. I don't, because I'm not built like the Barbie
doll they appear to have been designed for! I did get a pattern from Elizabeth
Lee Designs, which looked like it was made for a more realistic woman. However,
the one I sewed ended up self-destructing, as my ample waist was placing too
much stress on the inner curve. I made myself a second one after that, altering
the pattern so it was large enough to go around me, and have been using it ever
since. However, I thought, it would have been so simple just to make one that
would fit *me* the first time, why don't I help other women with that?