Adding padding and/or a colorful shoulder accent to an unpadded sling
This is more of a setting down of ideas than anything else -- the idea came
to me during a discussion on the BabyWearer about making slipcovers for mei
tais and I thought it would be good to put this down on "paper" while I have
the chance.
 the idea here is to make sort of a sleeve that would go above the rings and
surround the shoulder area of the sling -- sort of a neglected area in terms
of decoration! If you had a wide sling (say, one that was made with a ga thered
shoulder) and wanted to make it consistently narrower without taking out your
stitching, or you had a sling that was folded differently and wanted to add some
(removable) shoulder padding, this would be a solution. An unpadded shoulder
accent could be made with two different fabrics, to be reversible, so that you
could have multiple looks with a very quick sewing job. This would also hide
a messy sewing job, and make the entire sling reversible, since it would cover
up the shoulder stitching. And Rachel from the Babywearer mentions that it could
keep the baby from bumping her head on the rings -- I hadn't even thought of
that, but if you made it wide enough at the base to cover the rings, it might
also make the sling look more "streamlined" as well as being a head
protector.
the idea here is to make sort of a sleeve that would go above the rings and
surround the shoulder area of the sling -- sort of a neglected area in terms
of decoration! If you had a wide sling (say, one that was made with a ga thered
shoulder) and wanted to make it consistently narrower without taking out your
stitching, or you had a sling that was folded differently and wanted to add some
(removable) shoulder padding, this would be a solution. An unpadded shoulder
accent could be made with two different fabrics, to be reversible, so that you
could have multiple looks with a very quick sewing job. This would also hide
a messy sewing job, and make the entire sling reversible, since it would cover
up the shoulder stitching. And Rachel from the Babywearer mentions that it could
keep the baby from bumping her head on the rings -- I hadn't even thought of
that, but if you made it wide enough at the base to cover the rings, it might
also make the sling look more "streamlined" as well as being a head
protector.
Materials:
- Fat quarters (that's a piece of calico cut to 18" by 22" -- a "fat" quarter
of a square yard, as opposed to a narrow quarter, which would be 9" by 44") )or
the equivalent of a decorative fabric (or plain, as your tastes go).
- Polar fleece or batting for padding (no more than fat quarter sized) if desired
- Thread, sewing machine, existing sling to trace or eyeball
Method:
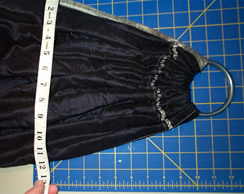 First, figure
out how wide you want the shoulder to be. If you're retrofitting a ga thered sling
to be narrower, try scrunching the fabric around the rings until it's as wide
as you like (this is best while you're wearing it), and then measure, both right
at the ring end (which will likely be between 2-3", depending on the size of
the rings you have) and about 10" above
the rings (this measurement depends on your personal preference -- it may be
anywhere between 8-12",
I would say -- but I will use 10" for consistency). If you are adding padding
to a folded-shoulder unpadded sling, measure the actual width of the fabric at
the rings and again about 10" above.
First, figure
out how wide you want the shoulder to be. If you're retrofitting a ga thered sling
to be narrower, try scrunching the fabric around the rings until it's as wide
as you like (this is best while you're wearing it), and then measure, both right
at the ring end (which will likely be between 2-3", depending on the size of
the rings you have) and about 10" above
the rings (this measurement depends on your personal preference -- it may be
anywhere between 8-12",
I would say -- but I will use 10" for consistency). If you are adding padding
to a folded-shoulder unpadded sling, measure the actual width of the fabric at
the rings and again about 10" above. 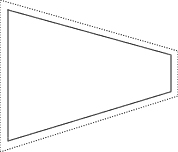 You will probably want to fan the sling
fabric out as wide as you prefer it when you're wearing it. Keep in mind that
the narrow end ( the ring end of the sleeve) will have to go over your rings,
unless you slide it on from the tail up to the shoulder.
You will probably want to fan the sling
fabric out as wide as you prefer it when you're wearing it. Keep in mind that
the narrow end ( the ring end of the sleeve) will have to go over your rings,
unless you slide it on from the tail up to the shoulder.
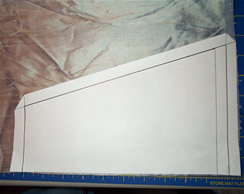
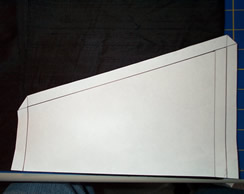
Next, draw up a quick paper pattern using those measurements. Basically, you'll
be making a trapezoid with a narrow side as wide as the fabric at the rings,
and a wider side 10" from the rings. Add about 1/2" on each side for hems and
seam allowances -- more if you prefer a wider hem and/or seam allowance in your
sewing.
If
you are just making a shoulder accent or a ga thered shoulder container (lol!),
all you need to do is cut your fabric and sew. I would hem the top and bottom
(short and long) edges before sewing the pieces together, because it's tricky
to hem stuff when the edges aren't the same length. So hem those edges, then
sew the two pieces right-sides-together, turn right side out, and you're pretty
much done.
If you find that the sleeve moves around on the shoulder, you
could make a sort of strap that holds it at the ring end (i.e. sew a tab to the
bottom piece, and fasten it to the top part as you see fit -- a decorative button
would be cute, or a matching/contrasting snap, or a piece of Velcro™ if
you want to hide the fastening) and either make a buttonhole or just hand-tack
the wider end into place on the sling fabric.
If you are adding padding, cut three pieces of the fabric and one or two of
the padding -- the padding should be cut to the size of your pattern *without*
seam allowances, so that it can be easily encased in the fabric. Sew the short
and long sides of the underpieces (which will encase the padding) together, then
slide your padding material inside, so that it's centered within the underpieces.
I would then baste the two open sides, to keep the padding from moving around
as you sew the padding/underpieces to the top. Then proceed as above -- the raw
edges of your underpieces will be on the inside of the finished accent after
you've sewn them to the fashion fabric, which will be on top.
You could also make it reversible and padded, if you made the padding
section sort of free-floating: for this one, I would just add a layer of fashion
fabric to the sandwich so that you had the padding underpieces (with padding
inside, as above), one fashion fabric, right side up, and the other fashion fabric,
right side down (so that the two fashion fabrics were right sides together on
top of the padding). Then, when you sew the edges together and turn it right-side-out,
you'll have three layers: fashion fabric, padding section, fashion fabric. To
use it, you'd just make sure the padding went underneath the sling shoulder whichever
way you put it on. The following directions are for a padded, reversible shoulder
sleeve -- the other versions should be easier to figure out :)
Pieces to cut for a reversible, padded shoulder sleeve:
Two fashion fabric, two padding underpieces, one or two pieces of padding
(I used scrap fleece)
Sewing:
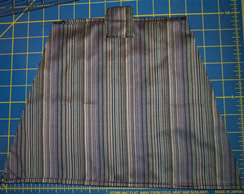 |
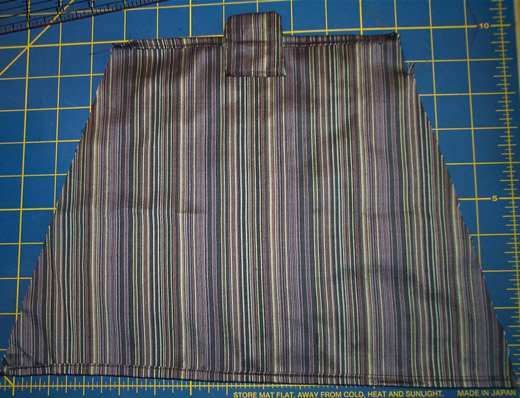
Hem the top and bottom edges of the fashion fabric pieces (here, a striped
dupioni silk - not shown is the plain dupioni I have on the underside). I have
also added a small tab at the top for the snap I will later apply. |
 |
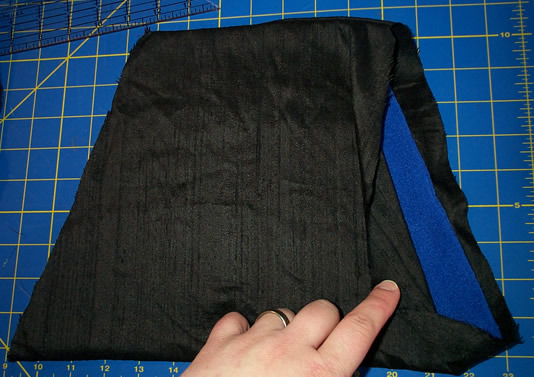
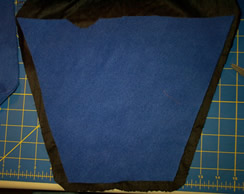
Shown here is the padding inside the underpieces that surround it. I sewed
the top and bottom edges of the underpieces together, then centered the padding
inside. |
 |
Here's the sandwich of material. The padding/underpiece part is on the bottom,
followed by one of the fashion fabric pieces, right-side-up, and the second fashion
fabric piece, right-side down. Pin both sides before sewing, unless your fabric
doens't move around much (silk surely does!). |
 |
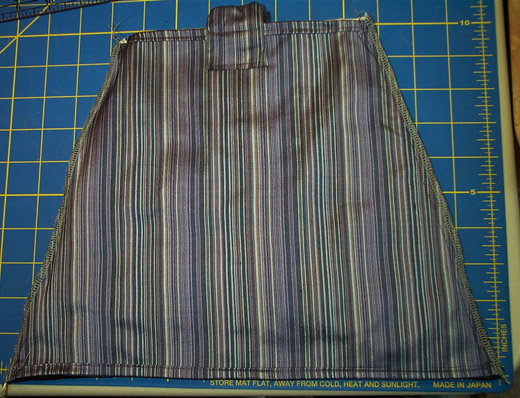
the sides are sewn together here -- the top and bottom should remain open.
I have sewn the left and right sides, and then serged the edges to avoid fraying.
If you don't have a serger, you can go over any raw edges with a zigzag stitch,
or sew the stack in the opposite order (with the fashion fabrics' wrong sides
together) and make a French seam before turning the stack right sides out. |
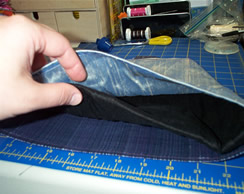 |
This is what the "inside" of the sleeve looks like. You can see that the
padding is completely encased in fabric -- you could skip this step, but I like
the look of it, encased -- and the sleeve can be put on the sling with the padding
towards either fashion fabric, making it fully reversible. |
|
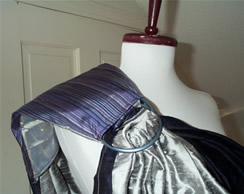
Here's what it looks like on a sling -- I've used the tabs to keep the sleeve
in place on the shoulder, although it could use some tacking where the sleeve
ends behind my shoulder, to keep it from moving around. I'm not sure what the
best way to do that is, without permanently or semi-permanently attaching the
sleeve to the sling. However, once it's on, it stays in place pretty well with
the weight of a child (mine wasn't cooperating for a photo session, alas...). |
Pattern caveats:
If you would like to
make sleeves like this to sell, I ask that you email
me before you proceed. I will be happy to work with you in developing the
idea, but I've put it here on "paper" to put my stamp on it. Of course,
it is entirely possible that others have independently discovered
this, and will in the future as well, but if you're reading these directions
and want to do it, I'm sure you can guess what is the right thing to do ;)
Reader Suggestions -slash- Been there, Done That:
Joslin from the BabyWearer has made these before, and this was her method:
the one sleeve I found is 6 inches wide and 4 inches high (when flat-12
1/2 inches before sewing it into a circle) with fleece inside. I am guessing
this is the one I liked because the others are gone! Here's how I did it (like
making a short strap):
- Cut a rectangle (8 1/2 x 12 1/2)
- old right sides together
and sew the long side
- turn it right side out and iron with the seam at one edge
- fold the raw edges of one end to the inside about 1/2 in. and press
- If you
want fleece padding cut a piece or more (depending on how fluffy you want it)
4 in. x 12 in. and place it inside the tube
- Stick the raw edge inside the folded
edge and sew closed to make it into a circle
- Un-thread your sling, slip the
sleeve over the rings
- Re-thread and move the sleeve up or down to place it on
your shoulder nicely
Just to add-I am a little mama- My neck to shoulder measurement
is only 5 inches! So, if you are larger take this into account and make yours
wider. I placed this on very close to the rings so it kept the ga thers close
together, but the fabric could go over my shoulder and the "sleeve" kept
the fabric from sliding way down my arm.
All content, barring that which is otherwise attributed, is ©2023 to
Jan Andrea. If you wish to use my content on another page, please email before
doing so, even for content with the Creative Commons licenses. Text/images used
elsewhere must be attributed to me. Be advised that I will pursue copyright
violations.
 the idea here is to make sort of a sleeve that would go above the rings and
surround the shoulder area of the sling -- sort of a neglected area in terms
of decoration! If you had a wide sling (say, one that was made with a ga thered
shoulder) and wanted to make it consistently narrower without taking out your
stitching, or you had a sling that was folded differently and wanted to add some
(removable) shoulder padding, this would be a solution. An unpadded shoulder
accent could be made with two different fabrics, to be reversible, so that you
could have multiple looks with a very quick sewing job. This would also hide
a messy sewing job, and make the entire sling reversible, since it would cover
up the shoulder stitching. And Rachel from the Babywearer mentions that it could
keep the baby from bumping her head on the rings -- I hadn't even thought of
that, but if you made it wide enough at the base to cover the rings, it might
also make the sling look more "streamlined" as well as being a head
protector.
the idea here is to make sort of a sleeve that would go above the rings and
surround the shoulder area of the sling -- sort of a neglected area in terms
of decoration! If you had a wide sling (say, one that was made with a ga thered
shoulder) and wanted to make it consistently narrower without taking out your
stitching, or you had a sling that was folded differently and wanted to add some
(removable) shoulder padding, this would be a solution. An unpadded shoulder
accent could be made with two different fabrics, to be reversible, so that you
could have multiple looks with a very quick sewing job. This would also hide
a messy sewing job, and make the entire sling reversible, since it would cover
up the shoulder stitching. And Rachel from the Babywearer mentions that it could
keep the baby from bumping her head on the rings -- I hadn't even thought of
that, but if you made it wide enough at the base to cover the rings, it might
also make the sling look more "streamlined" as well as being a head
protector.