 Of
course, there are other methods (see two others on this site!). You can
use the method when you have not quite enough of one fabric, but have more than
enough of the lining.
Of
course, there are other methods (see two others on this site!). You can
use the method when you have not quite enough of one fabric, but have more than
enough of the lining. Of
course, there are other methods (see two others on this site!). You can
use the method when you have not quite enough of one fabric, but have more than
enough of the lining.
Please note: if you're making slings using this method that you intend to sell, please include a link back to these instructions in your sales page. I was pretty happy being the only overlapping-pleat sling maker on the market, and would like a little credit if you're selling them! You can use the graphic at the bottom of the page, or just a text link -- either is fine. these directions have taken me many, many hours to put together -- they are not just some random freebie. All directions on the site are copyright to Jan Andrea, for personal use only, and are not intended for bulk resale.
Here's a video for those who are more visually-oriented, but PLEASE read through the directions and cautions below before you actually sew -- the video omits some things (like fabric choices) for brevity, but they are still very important.
Sew your fabrics together, right sides together, like a pillowcase. Leave a 4" gap somewhere along the seam so you can turn it right-side-out. After turning, topstitch the edges (and/or iron if you are so inclined). Sew the rings in using your favorite shoulder style. This sling won't be fully reversible if you don't like the opposite color showing at the shoulder, but it's quick and relatively painless. Thicker fabrics will, however, be very difficult to sew through if you're using more than 3-4 folds at the shoudler, because you'll be going through a lot of layers, and that can make the shoulder look messy on the "wrong" side.
If your fabric is wider than about 36", I would suggest cutting it down to 36" or less. If your fabric is thick, 30" is about as wide as I would recommend; if it is thinner, 36" is fine. You can certainly use the trick in my original sling sewing page of buying 1.25 yards of 60" wide fabric and cutting it down the middle to make a 2.5 yard long piece (for example). However, most silk brocades come in a 36-42" width, so that probably won't be possible.
If you have enough of both fabrics to make a full-length sling, sew the two fabrics right sides together with a 3" overlap on one side -- the heavier of the two fabrics (if there is a difference) should be the one with the overlap. Topstitch along the seam for extra strength. This will allow your sling to be fully reversible, without any of the opposite fabric showing in the shoulder.

If your fabric is only 2 yards long but you want a finished length of more than 2 yards, try this trick: buy more of the lining -- enough so that you have a total length that's twice as long as your finished sling will be. In my case, I had 2 yards of brocade, but wanted a 2.5 yard long sling, so I bought 3 yards of the lining. I then cut the lining fabric (45" wide) to the same width as the brocade (36") and sewed them together along the short edges, as shown below:

If you want a pocket in your sling, I would recommend using an inset pocket. I have made pockets where I put a facing on the brocade, sewed in the zipper, and then just sewed the two fabric layers together to form the pocket bag, but have since rethought the idea, as that can add stress to both layers and shorten the life of the sling. An inset pocket with a zipper takes a little more time to create, but the results are more professional. Click here for a full page with instructions.
 Sew
the two prepared fabrics together along the short edge (right sides together,
with a 3" overlap on one edge). Unless they are different lengths, the rings
will lie along this seam, so make sure it's very sturdy! Topstitch over that
seam for strength. You'll want a strong seam, but not a bulky one, or the ring
attachment can look weird.
Sew
the two prepared fabrics together along the short edge (right sides together,
with a 3" overlap on one edge). Unless they are different lengths, the rings
will lie along this seam, so make sure it's very sturdy! Topstitch over that
seam for strength. You'll want a strong seam, but not a bulky one, or the ring
attachment can look weird.
I think this is where a pleated shoulder really shines. You can also use a gathered shoulder or a "hotdog" method, but I've never tried those myself. I prefer pleats over a fanned shoulder for this purpose because the pleats add extra strength to the seam -- any rip will have to go through 3 or more layers, instead of just one (as would be the case for a gathered shoulder), for the rings to tear out. For a two-layer sling, I sew in the pleats rather than just pinning them. I fold the fabric in half lengthwise, then sew a 2" wide pleat from 3" above the seam to 3" below it. Then I fold another 2" wide pleat so that it lies 1" from the first one, and repeat that on both sides until the whole width is pleated, leaving between 2-3" on the edges for sewing. Click here for step-by-step photographic directions.
For a more finished look, I usually fold the pleats so that they overlap on each other, and baste through them to keep them in place. I open out the center pleat, so that there's 1" on each side of the sewing line, then fold the pleats on either side down so they overlap it; then the next set; then the next, until all the pleats are pointing towards the center. Baste through this with stitches you can remove easily later. Click here for step-by-step photographic directions.
If you prefer a standard pleat rather than sewn-in pleats, lay the sewn fabric out so that the center seam is in the middle of your workspace -- you should have one color/fabric on your right, and the other on your left. Pleat the fabric as you normally would, but put pins in 2.5" from either side of the center seam. One side should have the 3" overlap included in its pleats. Baste the pleats in, and continue as below.
 Thread the rings onto the fabric so they're in the center
of the pleated section. The pleated section will wrap around the rings a fair
amount -- don't worry about that.
Thread the rings onto the fabric so they're in the center
of the pleated section. The pleated section will wrap around the rings a fair
amount -- don't worry about that.
 Fold
the two layers with their right sides together. You may want to pin before sewing,
especially if you're using brocade and silk -- they can be very slippery. then
sew around the edges, leaving a 4" wide space for turning at the bottom
of the sling. Go slowly and don't get frustrated -- sewing slippery fabrics
can be very awkward, which is why I charge extra when I sew them for other
people. When you're done sewing, make sure you take out all the pins :)
Fold
the two layers with their right sides together. You may want to pin before sewing,
especially if you're using brocade and silk -- they can be very slippery. then
sew around the edges, leaving a 4" wide space for turning at the bottom
of the sling. Go slowly and don't get frustrated -- sewing slippery fabrics
can be very awkward, which is why I charge extra when I sew them for other
people. When you're done sewing, make sure you take out all the pins :)
 Turn the sling right-side-out through the space at the bottom of the sling.
It's easiest for me to reach between the layers, grab the rings, and just pull.
I usually topstitch about 1/4" from the edge of the sling all the way around,
making sure to catch the turning opening. I generally fold a bit more than the
seam allowance to the inside at the ring end, just for looks. It gets trickier
to stitch close to the rings, so I usually end up stopping about an inch from
the rings. You can hand-sew those small openings closed, but it's not strictly
necessary, as long as there's not a problem with fraying.
Turn the sling right-side-out through the space at the bottom of the sling.
It's easiest for me to reach between the layers, grab the rings, and just pull.
I usually topstitch about 1/4" from the edge of the sling all the way around,
making sure to catch the turning opening. I generally fold a bit more than the
seam allowance to the inside at the ring end, just for looks. It gets trickier
to stitch close to the rings, so I usually end up stopping about an inch from
the rings. You can hand-sew those small openings closed, but it's not strictly
necessary, as long as there's not a problem with fraying.
 If one of your fabrics is slightly wider than the other (eg. 32" vs 30"),
you can use that to make a nice-looking edge finish. Sew both long edges together
first (from ring-end to the end of the tail), then pin the end of the tail so
that the center of each length of fabric lines up. The corners will then have
a folded overlap. Sew the end of the tail, leaving a space for turning. When
you turn the sling right-side-out, there will be a rail of the lining color along
the edges. I usually try to turn the seam so that it's within that rail, then
topstitch.
If one of your fabrics is slightly wider than the other (eg. 32" vs 30"),
you can use that to make a nice-looking edge finish. Sew both long edges together
first (from ring-end to the end of the tail), then pin the end of the tail so
that the center of each length of fabric lines up. The corners will then have
a folded overlap. Sew the end of the tail, leaving a space for turning. When
you turn the sling right-side-out, there will be a rail of the lining color along
the edges. I usually try to turn the seam so that it's within that rail, then
topstitch.
 |
 |
| Brocade side, ring end | Silk dupioni side, ring end |
 |
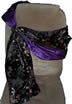
Full sling, threaded. Inset pocket also visible, though it's not as obvious in natural lighting. (In fact, the person I made this sling for couldn't find the pocket at first!) |
I finally got around to adding illustrated directions on threading and wearing your sling. Please check them out! If you have any questions, please email me!