Nursing shirts that don't break the budget!
Back to Baby Crafts | To HTML (color) version of these directions | To my home page
 |
|
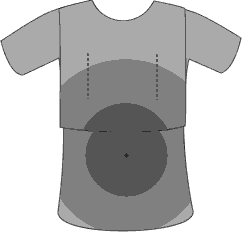
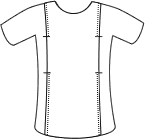
Nursing shirt with vertical overlay
|
 |
|
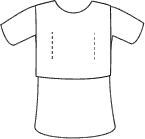
Nursing shirt with horizontal overlay
|
No doubt you've walked past the "Motherhood Maternity" stores and looked at their nursing clothes. I have, and realized early on that they didn't make anything in my size. Same deal with the majority of nursing clothes makers whose catalogs I've seen... not to mention how expensive they usually are! I've seen nursing t-shirts go for anywhere between $16 to $30 -- maybe some people can afford that, but it seemed ludicrous to me, given that normal t-shirts are between $4 and maybe $15 if you get something fancy. Of course, some women can nurse by just lifting up their shirts, but I never felt comfortable doing that.
Anyway, I got a few shirt patterns from Elizabeth Lee Designs, and I recommend them very highly. They come in a nice range of sizes, and there are several different designs. But if you want something quick and dirty, there's nothing like cutting up ready-made shirts and putting them back together; I think it took me about an hour and a half to make three this way. If you're good, you could even make a matching outfit for your baby with the leftover pieces!
Materials Needed:
 For two or three nursing t-shirts:
- Three or four identical t-shirts -- I like to get men's shirts from WalMart, because they're usually a fraction of the price of women's shirts. Whenever I see t-shirts on clearance, I grab a few, and have a decent nursing wardrobe from them. You could also use different-coloured shirts, if the colours look good together (or not -- whatever floats your boat!).
- Thread
- Sewing machine
- 1-3 hours, depending on how experienced a seamstress you are.
Preparing the shirts:
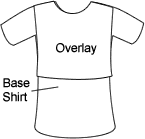
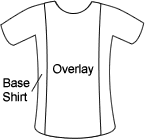
- I will refer to the shirts as the overlay shirt, for the one that will be sacrificed to make the overlays; and the base shirts, for the ones that will have the overlay added to them.
- I don't like the normal neckline on t-shirts -- the ribbing close to my neck feels too confining, and looks awful, too. So my first step is usually to cut off the neck ribbing. If I'm feeling crafty, I finish the cut edge and use it as a matching hairband. Stupid, but practical. You don't have to cut off the ribbing on the base shirt if you don't want to, but will probably need to cut it off the overlay.
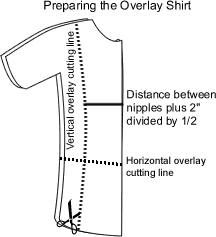
- To prepare the overlay shirt for vertical overlays, fold the shirt in half lengthwise, marking this point on the front and back at the bottom. Determine the distance between your nipples (approximately) and add 2 inches to the measurement. Now, halve that measurement, and cut that distance from the edge of the fold (see picture at right). Now cut them apart at the shoulders, and you have two identical overlay panels.
- If you want horizontal overlays, first remove the sleeves. You can just cut them off around the seamline; there's no need to use a stitch ripper on the seam, since the sleeve seam will be finished. Then cut the overlay shirt at around belly-button level, or somewhat higher if you are smaller-breasted.) The idea is for the overlay to completely cover the openings you will cut in the base shirt, and the length of the openings will depend on the size of your breasts -- larger breasts necessitate longer openings.) Again, cut the two overlays apart at the shoulders, and also at the sides -- if there are side seams, cut along them; otherwise, just try to make the two overlays identical.
- If you are making vertical overlays and the shirt was big enough, you may have enough fabric to make a third nursing shirt. For this one, cut off the sleeve of one of the side sections that are left over. Approximate a neckline at the top of the section. This overlay will not go all the way down to the bottom seam when placed on a t-shirt, but it's fine for wearing underneath overalls or sleeveless dresses/jumpers.
- Otherwise, you might have enough fabric left over for a matching shirt for baby, should you be feeling really crafty.
Directions for sewing the shirts:
- Finish the edges of the overlays. If you have an overlock machine and don't mind the look, just do an overlock stitch on all the unfinished (cut) edges. Otherwise, fold the cut edge under by about 1/2 inch and do a zig-zag stitch on the edge, being careful not to stretch the fabric. Of course, if your machine has special stitches for stretchy fabrics like knits, use whatever one you like best. For the vertical overlay, you'll need to finish the left and right sides -- don't do the neckline yet. For the horizontal overlay, just do the bottom edge and the armhole edges.
- There are two ways to do the shoulders. You can finish them beforehand, and topstitch them to the shoulder seamlines on the base shirt, or you can sew the overlay to the base shirt with the right side of the overlay against the right side of the back, like you're making sort of a facing. Then you flip the overlay to the right side, and you have nicely finished shoulders with no visible seams.
- Necklines:
Note: If you are doing a horizontal overlay, read through section 4.b before stitching the neckline!
- If you have removed the ribbing from the neckline, you can use the overlay to make a finished neckline. Just to pin necklines of the overlay to the shirt, right sides up (the way they'll be when worn), and fold both edges under together. Continue this seam around the back as well. I have also done this using the overlay as sort of a backwards facing, but it takes longer and is easier to mess up, so I'll leave it as an exercise to the reader.
- If you haven't removed the ribbing, just finish the neckline on the overlay -- you may not want to sew it to the base shirt neckline.
 Now the fun part -- sewing the overlay to the shirt itself. This is different for the horizontal and vertical overlays.
- Vertical overlay:
- Having sewn the shoulders and neckline, next match the bottom edges. You should have a mark at the foldline of the overlay. Find the same point on the base shirt, to make sure you're matching the overlay and the shirt -- if they are not lined up, you'll get some weird lines happening when it's sewn together. When you're sure you've matched centers to centers, sew the bottom edges together -- I use the existing seamlines.
- The tricky part is making sure you leave nursing openings in the right place when sewing the overlay to the shirt. At this point, I usually try on the shirt, and use safety pins to mark the top and bottom parts of the opening. Sew the overlay to the shirt from the shoulder to the top pin, and from the bottom pin to the bottom edge, sewing over the stitches you made when finishing the overlay edges. Again, be careful that the overlay is flat against the shirt; if it's not, you'll have some weird puckers.
- Now all you need to do is cut the opening in the base shirt. I usually use the center foldline as a guide, and cut from just below the neckline (assuming the necklines are stitched together) to about belly-button level. You can do this ahead of time and finish the edges, but since knits don't tend to fray and this is a quick-and-dirty project, I don't usually bother.
- Horizontal overlay:
- I think the easiest way to do this is to put the overlay, right side down, against the right-side back of the base shirt. Sew the shoulder seams as above, but without turning the overlay to the front, find the center point under the arms, where you made the cut to separate the two overlay pieces.
- Stitch a seam from the armpit down to the bottom edge of the overlay, so that when you turn the overlay to the right side, you have hidden seams on the shoulders and the sides. Make sure the overlay is the same width as the front of the shirt between the two seams, so that the overlay isn't too tight or loose against the shirt.
- Turn the overlay to the front, and stitch the neckline.
- To cut the nursing openings, try the shirt on, lift the overlay, and take note of where your nipples are. Mark above and below the nipples, leaving enough room for the baby to latch on through the opening. Cut away. It's best to cut a small slit first, see if it's large enough, and enlarge accordingly, rather than making too big an opening first.
- You're done! Have fun nursing with this practical, easy shirt!
Hints for use:
- You can do this same trick with shirts you make yourself -- just add the overlay with any leftover fabric, or use a contrasting fabric. I've taken to cutting out the regular pattern, then using the front piece to make a vertical overlay by folding it along the appropriate measurement from the center. For horizontal overlays, use the front piece again and just cut the fabric at the level at which you'd like the overlay to end. This way, you can sew the seams together, avoiding the topstitching we did here.
- If you want something really quick-and-dirty, just cut slits in an old t-shirt and wear it under a vest or jumper. I did this for a funeral when Stephen was very little, and I had only one black dress and not enough time to make a new one. I already had a long black vest, so I just cut two slits in the dress and wore the vest over it. That's become my favorite outfit for orchestra concerts -- I can nurse Stephen before or after the concert without having to change.
- To nurse in these shirts, undo your nursing bra, reach into or under the overlay, pull the fabric aside, and latch the baby on. It takes a bit of practice to do this one-handed, but I think it's worth the effort.
Back to Baby Crafts | To HTML
(color) version of these directions | To my home
page
All content, barring that which is otherwise attributed, is ©2023 to
Jan Andrea. If you wish to use my content on another page, please email before
doing so, even for content with the Creative Commons licenses. Text/images used
elsewhere must be attributed to me. Be advised that I will pursue copyright
violations.