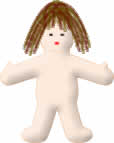
Waldorf-Style Simple Doll
 About the time Stephen's little sibling was born (October 2003), I realized
that he didn't have any dolls. I went to the usual suspects (mall, toy store,
etc.) to find one, but all the dolls I could find there were hard plastic, and
usually had accessories that didn't match our parenting style.
I looked online for free cloth doll patterns, but at the time, came up pretty
empty -- I didn't want to do the knotted
doll, as it seemed too simplistic for Stephen (who was 3 1/4 when
his sibling was born). I ended up ordering a pattern, but didn't like the way it turned
out -- the head was all out of scale with the body, and the limbs were very strangely-shaped,
and it took a long time to make something I wasn't happy with.
About the time Stephen's little sibling was born (October 2003), I realized
that he didn't have any dolls. I went to the usual suspects (mall, toy store,
etc.) to find one, but all the dolls I could find there were hard plastic, and
usually had accessories that didn't match our parenting style.
I looked online for free cloth doll patterns, but at the time, came up pretty
empty -- I didn't want to do the knotted
doll, as it seemed too simplistic for Stephen (who was 3 1/4 when
his sibling was born). I ended up ordering a pattern, but didn't like the way it turned
out -- the head was all out of scale with the body, and the limbs were very strangely-shaped,
and it took a long time to make something I wasn't happy with.
There is a set of
photographed
instructions for making a Waldorf-doll at Mothering.com, but no patterns.
I'm a pretty concrete sewer -- I need to have a pattern, even if it's something
I draft myself -- and I'm sure I'm not the only one, so here's a pattern based
on those directions.
Materials:
 Printout of pattern pieces
 - 1/3 yard skin-tone fabric for body and inside head (whatever skin tones you
prefer -- Caucasian dolls are fine with natural muslin, or you can tea-dye white
fabric to a darker shade, or use shades of brown)
- Matching thread (off-white is usually a decent match for lighter colors;
you could tea-dye your thread along with the fabric, or purchase the correct
shade)
- Stuffing (wool, cotton, or poly -- original patterns call for wool, but I
have no idea where to find that, and polyfill works fine too)
- Heaver cotton thread or dental floss (for shaping the head)
- Small amounts of embroidery floss or yarn (for facial features)
- Yarn for hair -- Lion Brand Homespun has a fantastic texture for hair, but
you can of course use whatever you have around.
Directions:
- Cut out head pieces.
- Sewing the head.
 Start
by creating the inside of the head:
Start
by creating the inside of the head:
- Sew the long sides of the inside head piece together. (Do not turn yet.)
- Tie off the top of the 5x10" piece of fabric where indicated on the
pattern piece.
- Turn right-side out.
- Stuff the head fairly firmly, leaving approximately 2" free at the bottom,
and stuffing the top portion (above the neck line) more than the lower portion.
- Tie off the bottom below the stuffing.
- Tie a piece of the cotton thread or dental floss around the stuffed part
of the head where indicated for the eye line.
- Repeat for the neck line.
- You can add a little nose if you sew a small bead to the head, below the
eyeline.
- Applying the "skin":
- Pull the 7x7" piece of fabric tightly around the inside head.
- Sew the edges of the fabric together in what will be the back of the head.
 Adding facial features:
- Using a very long needle, pull the embroidery thread or yarn through the
head, starting from the back and aiming for the eyeline.
- Make a small stitch, then pull the thread back through to the back of the
head. Knot well.
- Making the body:
- I usually like to cut my patterns out of the fabric before
sewing, but with something this small, you may prefer to cut two pattern pieces
out of paper, tape them together in the middle (along the fold line), then use the full-body pattern to trace the body directly onto the fabric -- that will
be the cutting line.
- then, sew the two layers
of fabric together (1/4" inside the cutting line), cutting along the cutting
lines when you are finished. Small features like the thumbs can be easier to
sew this way.
- Alternatively, you can cut the body pieces out (two, along the fold) and
sew along the sewing lines, though smaller details may be more difficult to sew
this way.
- Turn body right-side out and stuff. If you want bendy limbs, you can leave the joints less stuffed than the rest (especially at the points where the arms
and legs attach to the body).
- Attaching the head to the body:
- Feed neck into opening, folding raw edges of opening into body (just a little,
enough that the raw edges don't show).
- Sew neck to body, through all layers.
- Adding hair:
 Take your yarn and lay it flat, on top of a piece of paper. You'll need about
6" of width (with the hair running perpendicular to that).
Take your yarn and lay it flat, on top of a piece of paper. You'll need about
6" of width (with the hair running perpendicular to that). - Sew a part in the middle, including the paper. Once the seam is sewn, you
can remove the paper. This makes it a lot easier to sew than trying to sew just
through the yarn, as you can imagine!
- Sew the hair to the doll's head, starting where you would like the hairline
on the forehead and working your way backwards. This will cover up the seam in the back of the head. You may also want to stitch the hair down in whatever hairstyle
you prefer -- pigtails, braids, etc.
- Making clothes:
- You can make your own simple clo thes patterns by tracing around the doll
body pattern -- just add about 1/2" to allow for ease of dressing. Simple pants
and shirts are easy this way, and for a dress, just trace around the upper body,
and either leng then the hem, or add a ga thered skirt.
All content, barring that which is otherwise attributed, is ©2023 to
Jan Andrea. If you wish to use my content on another page, please email before
doing so, even for content with the Creative Commons licenses. Text/images used
elsewhere must be attributed to me. Be advised that I will pursue copyright
violations.