Toddler bed sheets that stay tucked in
 I
don't know about you, but once Stephen was ready for his own bed, I had an awful
time finding sheets that fit his bed and personality, and our price range. He's
still in a crib-mattress-sized bed, and will be for a couple more years (unless
we move and get him a twin bed!), but all the crib-sized sheets I could find
were yucky pastel baby prints -- not the thing for the train-loving 3-year-old
who is Stephen. That's his bed on the right. Because his bed is elevated,
it was especially important to have sheets that stay tucked in -- much easier
to make the bed that way. But even a regular bed and toddler can benefit from
these; Stephen has always moved around a lot in his sleep, and would wake up
wrapped in the sheet, which freaks him out when he wakes up, if it weren't secured
on at least two sides. So, without fur ther ado, here's my solution to the problem.
I
don't know about you, but once Stephen was ready for his own bed, I had an awful
time finding sheets that fit his bed and personality, and our price range. He's
still in a crib-mattress-sized bed, and will be for a couple more years (unless
we move and get him a twin bed!), but all the crib-sized sheets I could find
were yucky pastel baby prints -- not the thing for the train-loving 3-year-old
who is Stephen. That's his bed on the right. Because his bed is elevated,
it was especially important to have sheets that stay tucked in -- much easier
to make the bed that way. But even a regular bed and toddler can benefit from
these; Stephen has always moved around a lot in his sleep, and would wake up
wrapped in the sheet, which freaks him out when he wakes up, if it weren't secured
on at least two sides. So, without fur ther ado, here's my solution to the problem.
I found directions for the bottom/fitted sheet on a few other websites, but
it took me several readings to really "get" them, so I'm rewriting them
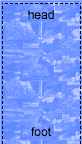
here. The bottom/fitted sheet is essentially a pillowcase for the mattress with
the opening at the foot end of the bed. I hadn't found anything for a top sheet,
probably because most people just use a plain rectangle of material, but that
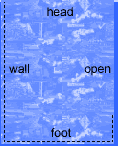
just wasn't working for us -- it never stayed tucked in. What I did was make sort
of a modified pillowcase -- it's open on two sides ( the head end, and the free
edge, if the child's bed is pushed against a wall) and sewn closed on the other
two sides. This means that there is always a length of fabric tucked under the
entire mattress, which keeps the sheet from coming loose on the wall side and
at the foot of the bed.
Materials Needed:
- Standard crib mattresses have these dimensions: 27.375" wide by 51.25"
long by 5.875" deep. It's a good idea to measure your mattress to make sure
it's the same -- some are deeper, some longer.
- Bearing that in mind, you'll need two pieces of material that are roughly
34" wide by 58-60" long for the bottom sheet, after washing; and two
pieces that are roughly 45" wide by 60" long for the top sheet. I used
the printed fabric only for the portions of the sheet that will show when the
bed is made, since it was $4/yard, and used some old sheeting for the portions
that are underneath the mattress, since they're not really visible.
- If you get 60" wide material, you'll need about 2.5 yards of each.
- For 45" wide material, you'll need about 3.5 yards of each, but you'll
have some left over for throw pillows or the like.
- I have found that the bottom sheet stays on without a fastener on the foot
end. However, you could use Velcro® or snaps to close the foot end if you
were so inclined. You'll need about a yard of Velcro® if you choose to close
the bottom, or a yard of snap tape.
- You can use twin, full, or queen sheets for this, too. A twin sheet folded
in half and stitched along one of the short sides does fine for the top sheet,
but should be more fitted (as per the directions below) for the bottom sheet.
Directions for sewing the bottom/fitted sheet:
 Wash your
fabrics before sewing, especially if you are using cotton or cotton blends! If
you sew first and wash later, you will *probably* still be able to get the sheet
onto the bed, but it will be tight!
Wash your
fabrics before sewing, especially if you are using cotton or cotton blends! If
you sew first and wash later, you will *probably* still be able to get the sheet
onto the bed, but it will be tight!- If you are using 60" material, cut it to 34" long. If you are using
45" material, cut it so that you have a piece that's 60" by 34".
You will have a long piece of 11" wide that you can later make pillows with.
- Sew the two long edges and one short edge, right sides of the fabric together,
as shown at right.
- Hem the open edge, sewing in the Velcro® or snap tape if desired.
 You can
finish the corners if you want to, but it's not really necessary.
You can
finish the corners if you want to, but it's not really necessary.
- If you decide you want to, fold the sheet so that the seams are together,
making a triangle with the seam running through the middle.
- Stitch the triangle as shown at right, so that the seam is about 6" long.
- Turn sheet right side out, and fit over the mattress like a pillowcase. Tuck
the corners in if you didn't finish them.
- there should be enough room under the sheet for a mattress pad or waterproof
pad, if your child is in that phase. If you make a few of these, you can make
sort of a sandwich, where you have a pad, a sheet, another pad, another sheet,
etc. (as many as will fit) to make middle-of- the-night accidents easier to clean
up after. Or you could just put the pad between the topmost and next layers, and
move it down as necessary, if it doesn't itself get too wet.
- If you used 45" material, make a throw pillow or two!
Directions for sewing the top sheet:
 Wash your
fabric! It's not as critical with this sheet as with the bottom, since it's less
fitted, but you'll want clean fabric for your child's bed anyway.
Wash your
fabric! It's not as critical with this sheet as with the bottom, since it's less
fitted, but you'll want clean fabric for your child's bed anyway.- If you're using 60" wide fabric, cut the pieces to 45" long each.
If using 45" fabric, cut them to 60" long. (Simple, eh?) these sheets
are wider than the fitted sheets to accomodate a sleeping child, with a little
extra to tuck in on the open side. You can make them even wider if you feel this
isn't enough.
- Stitch the two pieces together as shown at right. Make sure you compensate
for the fact that the sheet is sewn inside-out when figuring out which side should
be open! I added a short seam on the open side to help the sheet stay on and tucked
in better, but you don't have to. If using a twin sheet, just fold it in half
and stitch one of the short edges closed as shown. That way, you don't even have
to hem the edges! (This works best on sheets whose design isn't from head to foot,
because it gets turned 90 degrees when made into a crib sheet.)
- Finish the raw edges -- a narrow hem on the open side, and a wider one (like
"professional" sheets have) on the head end.
- Turn the sheet right-side out. When making the bed, put on the fitted sheet,
then stand the mattress so that the head is downwards. Put the sheet on so that
both sides are hanging down (one on the top side of the mattress and the other
on the bottom), then hold the two head/open corners together so that the sheet
stays on when you lower the mattress back onto the bed. I hope this makes sense.
- You can tuck in the lower corners if you like, or finish them as in the fitted
sheet above, but the latter is not really necessary. Finish with a blanket or
quilt.
- Of course, you can use this same trick with blankets, to keep them from coming
untucked. And if you do a nice finish on the inside stitching, or use a serger,
you can turn the sheet/blanket inside out, lengthening the time between washes
(because the portion the child was jumping on/sleeping under/etc. now goes under
the mattress).
All content, barring that which is otherwise attributed, is ©2023 to
Jan Andrea. If you wish to use my content on another page, please email before
doing so, even for content with the Creative Commons licenses. Text/images used
elsewhere must be attributed to me. Be advised that I will pursue copyright
violations.