If you want to make these bags to sell with your mei tais, please
let me know first, and include a link back to these directions so that people
can make their own if they choose. I don't think that will be a frequent occurance,
since they will not necessarily have access to matching fabrics, nor sewing abilities,
but I'd like to make that an option. See the bottom of the page for linking instructions.
Mei tai strap bag
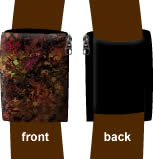 You
can put a pocket on your mei tai... but what
if you don't like the look of a pocket, or you've used one and haven't found
it practical for anything but a couple of diapers? Now you can add a rectangular
pouch/bag to the strap of your mei tai... and have the contents accessible whe ther
you're using it on your front or your back, without rethreading the bag, thanks
to a side-opening (as opposed to top or bottom) zipper. You could even add a
smaller pocket to the bag, and if you put button, snap, or Velcro® closures
on its top and bottom, it could also be used without flipping the bag on the
strap.
You
can put a pocket on your mei tai... but what
if you don't like the look of a pocket, or you've used one and haven't found
it practical for anything but a couple of diapers? Now you can add a rectangular
pouch/bag to the strap of your mei tai... and have the contents accessible whe ther
you're using it on your front or your back, without rethreading the bag, thanks
to a side-opening (as opposed to top or bottom) zipper. You could even add a
smaller pocket to the bag, and if you put button, snap, or Velcro® closures
on its top and bottom, it could also be used without flipping the bag on the
strap.
Of course, you can also apply this idea to a bag that can be used on the waist
straps of your mei tai... Or, if your waist straps are the same width as your
top straps, you can use the same bag!
This pattern is copyright to me (Jan Andrea)
and is NOT for resale under ANY circumstances!
Materials needed:
- Fabric:
- Whatever you used to make the straps of your mei tai. If you have a print/fashion
fabric panel on the body of your mei tai, you can use leftovers from your mei
tai to make the part of the bag that shows. The part that doesn't show could
be made of your leftover strap fabric.
- Matching thread
- One 5-7" zipper (depending on the desired finished length of the bag)
Sewing directions:
Please note: the finished size of the bag will depend on the width of your
mei tai's straps. The mei tai directions I have provided
will make straps 5.5" wide. You may choose to make them narrower or wider, but
the directions for the bag that follow will assume a 5.5" wide strap. Please
take that into account when figuring out the dimensions of your own pieces.
| 8" x 7" |
8" x 7" |
7" x 6" |
7" x 6" |
1. First,
cut a piece that is approximately 8" by 7" from your fashion fabric (if applicable)
for the front of the bag.
If you want to make the bag lined (which
can help it stand up a little better, and which I would recommend if your panel/fashion
fabric is made of a quilting cotton like batik or calico), cut three 7x7" squares
from your strap fabric. If not, just cut one.
For the portion that holds the bag in place, cut two 7" by 6" pieces.
 If
you want to add a hidden pocket, cut an even smaller piece (3x4", to
hold things like a credit card and a little cash). Hem the edges -- 1/2" hems
should suffice. Sew three sides of this piece to one of the 7x6" pieces. For
purposes of illustration, the hidden pocket is shown in the fashion print. If
you want it to be really hidden, use your strap fabric for this. (This pocket
will be right-side-up in only one direction, so if you use this feature, be sure
to turn the bag when going from a back carry to a front carry.)
If
you want to add a hidden pocket, cut an even smaller piece (3x4", to
hold things like a credit card and a little cash). Hem the edges -- 1/2" hems
should suffice. Sew three sides of this piece to one of the 7x6" pieces. For
purposes of illustration, the hidden pocket is shown in the fashion print. If
you want it to be really hidden, use your strap fabric for this. (This pocket
will be right-side-up in only one direction, so if you use this feature, be sure
to turn the bag when going from a back carry to a front carry.)
2. Sew the two 7x6" pieces together with a 5/8" seam allowance, leaving a
space for turning; turn. Toptstitch around the edges, closing the space used
for turning.
 3.
Sew the unit just completed (which should now be approximately 6.25" by 5") to
one of the 8x7" pieces, with the wrong side of the finished unit against the
right side of the 8x7" piece, along the left and right sides. Do not sew along
the top and the bottom! the stitching lines will ideally be about 5.5" apart,
the width of your strap. (This is one of those things you'll have to change if
your strap is wider or narrower.)
3.
Sew the unit just completed (which should now be approximately 6.25" by 5") to
one of the 8x7" pieces, with the wrong side of the finished unit against the
right side of the 8x7" piece, along the left and right sides. Do not sew along
the top and the bottom! the stitching lines will ideally be about 5.5" apart,
the width of your strap. (This is one of those things you'll have to change if
your strap is wider or narrower.)
4. For a lined bag, baste the fashion fabric to an 8x7" piece, and baste the
unit from the step above to another 8x7" piece. If your fabrics have a right
and wrong side, baste them wrong side to wrong side.
5. Now it's time to sew on the zipper. (I tend to choose the easiest method
for zipper sewing, but if you have a preferred method, feel free to use that
instead. An invisible zipper, for example, would be particularly pleasing in
this application from an aes thetic standpoint, but I think a regular zipper is
just fine, too, and is easier to sew.)
 I
recommend an actual zipper foot for this. You can do it with a regular foot and
the needle all the way to the left, but it turns out nicer with a zipper foot. Line
up the edge of the zipper (wrong side up) with the edge of the fashion fabric
(right side up). I find it simplest to start at the closed end of the zipper.
Sew as far down the zipper as you can before hitting the slider. Then, with the
needle in the fabric, lift the presser foot, open the zipper, lower the presser
foot, and sew the rest of the way. Leave the zipper open.
I
recommend an actual zipper foot for this. You can do it with a regular foot and
the needle all the way to the left, but it turns out nicer with a zipper foot. Line
up the edge of the zipper (wrong side up) with the edge of the fashion fabric
(right side up). I find it simplest to start at the closed end of the zipper.
Sew as far down the zipper as you can before hitting the slider. Then, with the
needle in the fabric, lift the presser foot, open the zipper, lower the presser
foot, and sew the rest of the way. Leave the zipper open.
 Now,
flip the fabric and zipper so their right sides are lined up with the right side
of the unit made in step 3 ( the fashion fabric will be wrong-side-up, or, if
lined, the lining will be on top). The open part of the zipper should be at the
top of the step 3 unit. Sew about 1.5" of the open zipper as above, then, with
the needle in the fabric, lift the presser foot, close the zipper, lower the
presser foot, and continue sewing to the bottom of the zipper.
Now,
flip the fabric and zipper so their right sides are lined up with the right side
of the unit made in step 3 ( the fashion fabric will be wrong-side-up, or, if
lined, the lining will be on top). The open part of the zipper should be at the
top of the step 3 unit. Sew about 1.5" of the open zipper as above, then, with
the needle in the fabric, lift the presser foot, close the zipper, lower the
presser foot, and continue sewing to the bottom of the zipper.
 6.
Now all you need to do is sew the remaining 3 sides of the bag closed. To make
the zipper look its most tidy, I generally line up all the edges, and keep the
seam allowances from the zipper sewing folded towards the rest of the bag, as
shown blown-up at right. This makes the zipper stand out from the fabric when
it's turned right-side-out, and has a finished appearance. Trim the ends of the
zipper close to (but not at) the side seams, and clip the corners.
6.
Now all you need to do is sew the remaining 3 sides of the bag closed. To make
the zipper look its most tidy, I generally line up all the edges, and keep the
seam allowances from the zipper sewing folded towards the rest of the bag, as
shown blown-up at right. This makes the zipper stand out from the fabric when
it's turned right-side-out, and has a finished appearance. Trim the ends of the
zipper close to (but not at) the side seams, and clip the corners.
7. Turn the finished bag right-side-out. You may topstitch the bag itself
if you desire, for stability, but it isn't strictly necessary. Now you can thread
it onto your mei tai's strap, fill it up with whatever you need, and have the
convenience of a bag without the hassle of carrying one!
Optional ideas:
To make a smaller pocket on the front of the bag (for your cell phone, small
items, etc), you can do a simple patch pocket as described above. However, that
will be secure only in one configuration, and the bag will have to be rethreaded
when you switch from front to back mei tai use. In order for it to be secure
without turning, you could make two flaps, one for each end, and have them close
with snaps, buttons, or hook-and-loop tape. Or you could make a single flap and
have it open from the side as well.
This bag also really lends itself to the addition of a toy loop, since
in front carry use, it will sit at the top of the mei tai body. To add a toy
loop, take a 4" by 2" strip of material, sew and turn, then sew the loop into
one of the bag's seams (preferably the one that will lie closest to the baby
when the bag is on the strap). When the mei tai is being used as a back carrier,
the toy loop is now a key loop :)
Of course, the bag can be whatever size you like, as long as the piece that
holds the bag to the mei tai strap is sewn to approximately the width of the
strap. I don't think it would work well if it were more than 1" wider on either
side of the strap, but it bears experimenting.
All content, barring that which is otherwise attributed, is ©2023 to
Jan Andrea. If you wish to use my content on another page, please email before
doing so, even for content with the Creative Commons licenses. Text/images used
elsewhere must be attributed to me. Be advised that I will pursue copyright
violations.