Tie-on baby seat
 By
request -- a portable cloth seat that ties on to an adult-sized chair. The lady
who requested the pattern called it a "chair sling" so you may know it by that
name. This will fit chairs with backs up to 16" wide. If you think you will
be using the seat with chairs wider than that, plan on buying more fabric --
up to 3/4 yard, rather than 1/2 yard. This pattern
is copyright to me (Jan Andrea) and is NOT for resale under ANY circumstances!
By
request -- a portable cloth seat that ties on to an adult-sized chair. The lady
who requested the pattern called it a "chair sling" so you may know it by that
name. This will fit chairs with backs up to 16" wide. If you think you will
be using the seat with chairs wider than that, plan on buying more fabric --
up to 3/4 yard, rather than 1/2 yard. This pattern
is copyright to me (Jan Andrea) and is NOT for resale under ANY circumstances!
Materials Needed:
- 1/2 to 3/4 yard of fabric -- sturdy is good, but calico is all right, too,
since at least in my experience, this doesn't get used terribly often.
- Four yards of 1/2" wide bias tape -- this will be used to finish the edges of the seat, as well as for the ties, or you can get just enough bias
tape to finish the cut edges and use a wider ribbon for the ties.
Sewing directions:
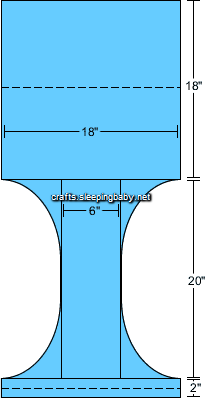
Layout shown at right. For wider chairs, make the width correspondingly wider.
I have not seen standard dining chairs with a width of greater than 24" -- that
is rather out of the ordinary -- so I think you will be safe with a cut width
of no more than 26". 18" is shown for standard 14" wide chair
backs.
Similarly, a standard chair back height is about 16". If your intended chair
height is greater than this, make the back section (shown at the top of the layout
diagram) longer.
 If you
are using 1/2 yard of fabric, just make sure the edges are relatively straight, then cut the seat part out. Do this by folding the seat section in half both
length- and width-wise, then tracing the edge of a plate around from one corner,
as shown at left.
If you
are using 1/2 yard of fabric, just make sure the edges are relatively straight, then cut the seat part out. Do this by folding the seat section in half both
length- and width-wise, then tracing the edge of a plate around from one corner,
as shown at left.
Use bias tape to finish the cut edges. When I'm in a hurry, I usually just
fold the tape around the edge and topstitch through all the layers. If I want
something a little nicer, I follow their directions and stitch twice, once with the tape unfolded, and then topstitch.
 Sew the remaining bias tape closed -- you can just topstitch the folds together.
This will make the ties a bit more finished.
Sew the remaining bias tape closed -- you can just topstitch the folds together.
This will make the ties a bit more finished.
Hem the top edge. Then fold the top section down along the dotted
line, right sides together. Insert two pieces of bias tape, each about 18" long,
into the seam at the bottom of the chair pocket. The tape will be on the inside
(between the right sides of the fabric), so that it ends up on the outside when
sewn. Stitch the left and right edges. This will create the pocket for the
chair back. Turn right-side out.
For the bottom edge, which will become the portion that ties around the baby's chest,
you can do the same thing as above -- fold the bottom edge with right sides together,
sandwiching the bias tape between at the left and right edges. The two ties should
be about 24" long each in this case, so that there's enough length to go around the baby, the chair, and tie in the back.
Last, stitch the shoulder ties into place, about 6" from each of the left
and right sides. These should be about 24" long as well, so that you can bring them over the baby's shoulders, over the top of the chair, and tie them around the ties you made for the chair pocket. Note: when sewing all of the ties into
place, be sure to sew them quite securely, as your baby may strain against them,
and it would be a Bad Thing if they broke when s/he was doing so!
Using the seat:
First, put the pocket ( the top folded part) over the chair back. Tighten the
ties so that it is secure. Next, put the baby in the middle of the seat part,
and bring the waist ties around to the back of the chair, tying securely, but
of course, not too tightly. Then bring the shoulder ties over the baby's shoulders,
over the back of the chair, and tie them to the chair back ties, or the waist
ties, or both.
For a better explanation and pictures, see http://www.supremecare.com.sg/Baboz.htm --
I have done my best not to make a direct copy of their seat, and if you prefer
not to sew this project, I would recommend theirs, as it is quite inexpensive.
Reader suggestions:
Hilary S wrote this: Since it seems like the built-in
seatbelts are almost always broken or missing, I added one by sewing a piece
of 1" nylon webbing
with a plastic buckle to the center back of the cover right along where the back
section meets the seat section. Then I left about 2" open on the seams joining
those two sections so I could wrap the belt around the back rails of the hi-chair
and put them through to the inside of the cover. A clean, functioning seatbelt
every time!
All content, barring that which is otherwise attributed, is ©2023 to
Jan Andrea. If you wish to use my content on another page, please email before
doing so, even for content with the Creative Commons licenses. Text/images used
elsewhere must be attributed to me. Be advised that I will pursue copyright
violations.